
May I?
Remember when you were a kid and you always had to ask Mom or Dad permission before doing anything so you wouldn’t get your bottom smacked? Boy, you couldn’t wait to grow up so you could do anything you wanted to do! Then you grew up and found out you still had to ask permission to do things. Bummer.
Building your own solar power system might well require you ask permission in the form of getting permits or filling out paperwork. On the other hand, it may not. I want to go through some examples, today.
Let’s start with some examples where you may do it yourself without a permit. We’ll start with some ridiculous examples like those little solar sidewalk lights. No permit, but it is solar. A more useful project would be a solar motion detector light for the corner of the garage. You actually get to use tools for that!
Let’s get a little more serious now. Do you have a boat? Sailboats and cruisers are a huge market for solar. I read the cruising forums and lots of folks are doing their own and there are some pretty serious systems. Heck, my expedition boat is 100% solar powered, even the galley. There are no permits involved, but the Coast Guard may come aboard, as they sometimes do, and they will want to see things safe. Your insurance company may require a survey, too. Use cables made for marine service, non-rusting hardware, lash down the batteries and protect things from the fingerpoking!
In fact, that general advice might be good for ANY kind of solar installation that you do. Use the right wire, make it look orderly and workmanlike, make it safe. Inspectors look for the scary-looking stuff, so don’t make it scary.
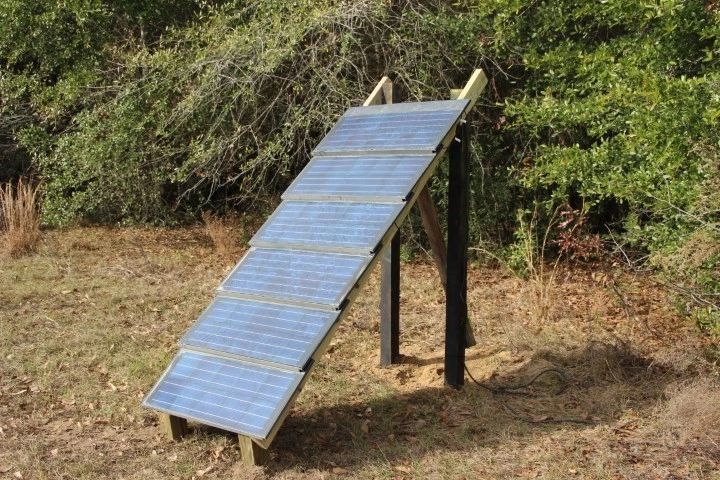
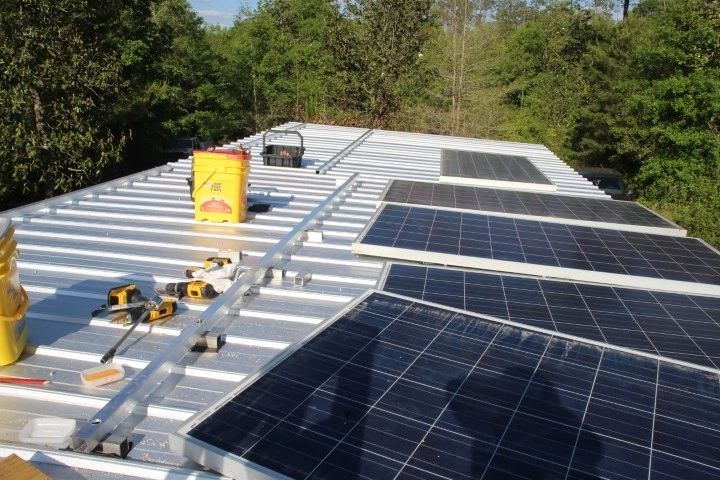
Motorhomes and RVs are another good place for DIY solar. The roofs may have vents, fans, skylights and antennae, but there is usually enough room up there to put in a good bit of solar. Mounting on offsets can allow for more solar, but may present an issue with wind lift. Besides, RVs tend to be pretty tall to start with. We have the notorious 17th Avenue Bridge in Pensacola, which has been the end to many an 18 wheeler and RV, so why tempt fate with added height? Keep it low. Know what the structure is, too. You want to get your bolts into something that will hold. A friend’s very large rig has a roof that is basically molded styrofoam covered in sheet metal! In a case like that, use lots of screws. On that rig, we considered using solar laminates (panels without the frames) bent to follow the curves and held in place with greenhouse channel. Because of all the other things up there to dodge, a mosaic of smaller panels might be the key to getting the most watts on the roof. Watch the weight, too. You don’t want to get it top heavy and go tipping over ! As long as your panels don’t come flying off, nobody will say a thing about permits for your RV power project.
Another RV project would be to have a portable setup. I know guys who go to big outdoor shows in their RVs. If they can find a shady spot, they will. Some set up panels on a stand away from their shade and can run fans and charge phones without ever having to fire up the noisy generator.
Are you a farmer or rural dweller? On the farm, most places I have seen, you are pretty much on your own when it comes to structures or electrical. I have all kinds of little solar projects for water pumping, lighting a shed, and even a major power plant that IS the shed. The smallest installation is a 10 watt panel bolted to back fender of a seldom-used tractor. I ran out of barn space, so it is rusty and faded, but, by golly, it’ll start when I need it. My neighbor Glen has some 10 watt panels I have swapped to him for welding or other favors. They are all over the place, keeping batteries topped up on equipment he doesn’t use a lot. A super low-cost farm project would be to have a small module and 12v LED light bulb for a tractor shed, using the battery in the tractor. Kill two birds with one stone, keeping the battery hot and having a light in the shed.
Now, let’s talk about permits and inspections. In most places, I can’t go out and install solar at your house because I am not a licensed contractor. You, however, as a homeowner, can probably get a permit to do your own work. We’ll talk a bit more about this in a moment. The job of the inspectors is to make sure you do a project safely and don’t kill anybody or burn your house down. That, having been said, you will sometimes find an inspector who is a bit of a tyrant and you will find inspectors who are nice guys that will work with you and help you out. There was a time when the inspectors in our county were very, very ….ummmm, well let’s just say the county had to issue them guns so that We The People wouldn’t kill them! Things have changed for the better and we have a bunch of good folks, now.
I can give two examples of the kinder, gentler inspectors. Stan has been building his “hunting camp” for years. His homemade solar and wind power system is a little dodgy, but works well and he is involved in a first class upgrade. Someone mentioned his place to the Inspections Department, which had previously failed to notice it, owing to its remote location. The inspector inspected and then declared that since there was no Certificate of Occupancy, he had no jurisdiction over the project.
Tom built a large outlaw system in his barn to power his house. He later confessed his sins so that he could go grid-tie and the inspector was nice as he could be, willing to work with Tom on bringing things up to code.
So, back to your permits, you need to go to the Inspections Office with a plan and not a vague idea. If you have a couple of ways you can go with the project, sketch them out and go and ask the inspector’s advice before finalizing things. Show respect and let the inspector know that you know who’s the boss. (Hint: it ain’t YOU!) The biggest way to cause yourself trouble is to go in with an attitude. You’ll get one back right in your face. When I built my house, I pulled all the permits and dealt with all of the inspectors. Each one may have some little quirk and may gig you on something just to let you know they are paying attention. Anything they noted, I corrected and then took to them before and after photos so they wouldn’t have to come back and crawl under the house or in the attic. That courtesy was returned with a quick sign-off on the job.
Note that in many areas, the inspectors are in the office very early for a short while and after lunch for a short while and in the field, inspecting, the rest of the time. Call ahead to discover their hours. Don’t be first in line. Let the pros get their business done and that’ll leave you more time for your consultations.
The most paperwork intensive system I have seen is Mike’s. South Carolina and Duke Power had a heckuva rebate program that would more than pay for the hardware if you shopped the right places. There was a lot of paper for the rebate program. Then, the structure over his barbecue area had to have a structural analysis to insure it wouldn’t fall over with solar panels on it. He got a licensed engineer to sign off on it. Then there were the electrical permits, which were pretty basic, and the paperwork for grid-tie, which had to be signed off by a NABCEP certified installer. THEY can be hard to come by, even with all of the solar activity we have going on these days. Things went well, though the NABCEP thing caused some delay. All that was left then was the IRS tax rebate form, which is easy and requires only receipts and no NABCEP or permits. Come to think about it, Mike may have come out ahead on the deal!
To sum it up, there are plenty of solar projects you can do without anybody’s permission. If you are going to attach it to your home, then you probably will need a permit, but as a homeowner, you can usually get one and do the work yourself. Just assure the inspectors you are competent and show them some respect. Asking their advice on how they might do a particular thing is something they usually like. John’s crew at Sun Electronics can help you with the system design, so you can go to the inspectors with a plan.
By: Neal Collier
Keep your powder dry….electronics, too
For some months, the wife has been grudgingly patient about the Trace 2524 in the living room. Why was there an inverter in the living room?
I’ve been engaged in a multi-year evolution in my power system, so lots of new stuff has been coming in and out of service. In our Southern climate we have humidity to spare and when you add temperature swings you get condensation. Stuff sweats, especially stuff containing heavy transformers. In operation, these bits of equipment put off a little heat, so they don’t sweat. The inverter spent a couple of decades in my attic, but it buzzed along happily because it was warm.
You do not want water creeping into your electrical gear. You just don’t.
The new power room in the Solar Shed is not quite a room, yet, as there is the fantail of the solar launch where the last wall should be. That will change, with the latest expansion, but until it does there is humidity. So, I have left unused things powered up to keep them warm and dry.
The 24 volt system is almost gone, now. Only one charge controller on the control panel and a couple in the launch, and the big 24 volt inverter are running because I have not run the new 120v wiring for lights and outlets in the newly expanded shed’s 48v system…and I have to keep the boat’s electronics warm. There isn’t much solar energy for the boat inside the shed, unless it comes in by wire.
The 2524 inverter is now out there, wrapped in plastic. Each decommissioned charge controller is getting wrapped and stowed in plastic storage tubs as it comes off the old control board. Some will be used in the Solar Yacht project, others will probably be used in the barn or sold. Until then, the plastic wrap should keep them fresh and dry until the control room is closed in. The heat of the control panel equipment should keep the winter humidity low and eliminate the condensation threat once the wall is in place. (Mexico has not offered to pay for my wall, either.) During the summer, there will be an a/c in there.
Batteries sweat, too. The danger there is that the moisture creates a small current path and you not only lose a little power, you get corroded terminals and attract crud. Mine are all outside the control room, now, and the hope is that an insulated battery enclosure will keep them from cooling down and sweating during the summer months.
Unless all of your equipment is in a climate controlled environment, or Arizona, add Saran wrap, plastic bags and tape to your supply list and keep your unused electronics dry!
By: Neal Collier
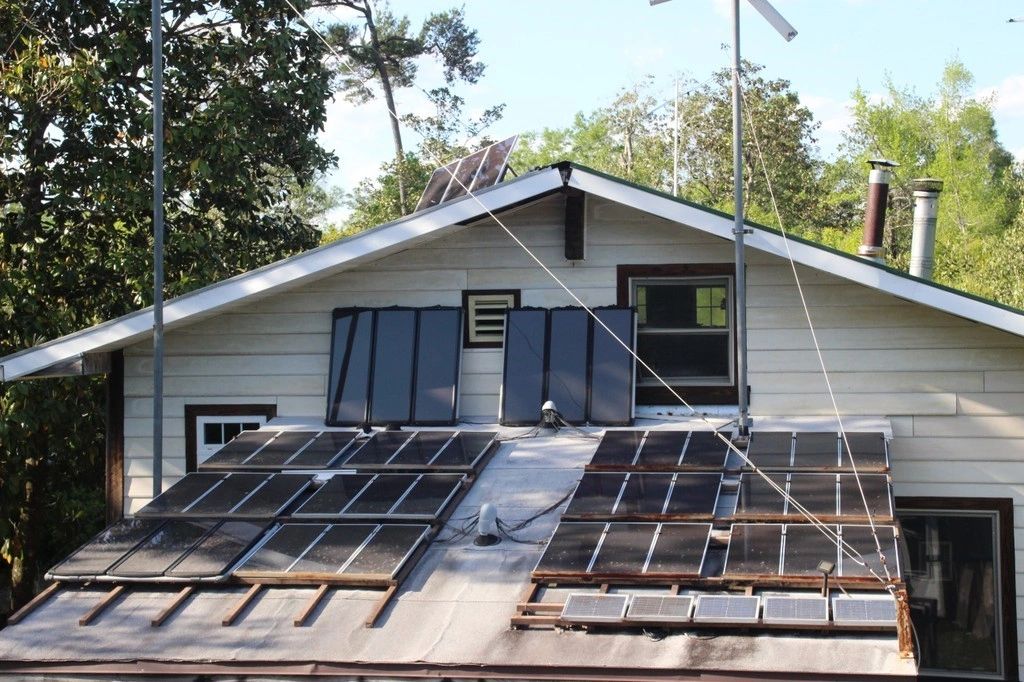
After playing phone tag the other day, John and I were having a conversation about all things solar and my Solar Shed phase 3 performance. He asked how well the modules were performing as these are all recycled salvage panels in the form of roof tiles.
I replied that they are doing well, having seen around 8kw with a 10kw nameplate rating. That concerned him and he seemed a little surprised when I made the point that modules never seem to make full rated power…not in the real world anyway.
You see, panels are tested and rated at an industry standard under conditions that are rarely encountered at most sites. It isn’t exactly a lie, but neither is it the real world. Never mind that mine are panels that have a permanent grime on them and were stomped and thrown off the roofs of their original installations. I have seen some panels with a second set of numbers on the label that represent a more likely scenario. These lower numbers are closer to what most folks will see.
First of all, there is the matter of the sky sometimes being reluctant to provide the industry-standard level of irradiation. In our area, we go for days at a time in winter with clouds and gloom. In the summer, with 95 degrees and 95% humitidy, we have a 10,000 foot layer of humidity that looks sorta like blue sky, but it blocks some of the sun. My Phase Two version of the solar shed had plenty of power on sunny days, but not enough battery to ride through the gloomy ones. After 4 days, I’d have to switch back to grid to save the batteries. Phase Three has enough modules to charge the larger battery pile, even on cloudy days. Getting the right balance of relatively cheap solar and expensive battery is tricky, but I think I have nailed it and have added more loads to the new 48v system.
Electrical resistance can take a small toll. Keep your cables fat and short for lowest resistance. Long skinny wires and parallel strings will give you a power loss. Each connector loses a little power. Since my system uses relatively small 34 watt modules, there are over 700 MC3 connectors up there!
Then there is the matter of the sun’s angle, relative to the panel surface. They test with the sunlight coming dead-on square with the panel. Tracking racks are available, but I don’t think they are worth the extra expense. If you have a fixed installation, then you will get that max output for an instant, twice a year. Right now, the sun is a little low to be hitting best power on my array. This summer, the sun will be high, but the days will be longer, so I am looking forward to sun-powered central air conditioning! Don’t let somebody tell you that you have to have your rooftop panels at a really ridiculous and ugly angle to improve your performance. I saw photos of a system mounted on an otherwise picturesque barn at such an angle as to make the image hideous. Mount your panels at the roof angle and just use more of them if you need to. Keep solar beautiful and fashionable. If I remember any of that sine and cosine stuff correctly, you’d have to be 60 degrees out of alignment to drop the output to half and on a cloudy day the diffusion of light by the clouds would make up for some of that loss.
I mentioned that these modules of mine have a permagrunge. Nothing cleans them! Then there is the layer of pollen that the pine trees are presently giving them between rain showers. In May, cropdusters at my place will give them a coating of red clay dust as they go roaring back and forth. That’s right, anything that blocks the sun blocks the power. The big solar farms are now playing with the use of robotic panel washers to keep the modules clean. One of those long-handled RV brush/squeegee thingamajiggers will probably do well enough for you.
There is also the temperature factor. Note on your label that your panels are rated at a certain temperature. Mounted close to the roof or even out in the open you are likely to find much higher temps on a sunny day. Output goes down as temperature goes up. The solar roof tiles I use probably benefit from being mounted on open purlins instead of a sealed plywood roof deck as code dictated in their original residential installations. Let your panels breathe!
So, if you use your panels on a cold, dry Himalayan mountaintop with sun trackers, you might come out even with the rated output of your modules. The good news is that they start making power as soon as the sky makes light, even down here in the hazy flatlands. My batteries are usually bulked up by 9:30 and it just keeps getting better until mid day. You’ll end up with 5 hours equivalent at full rated power if you live in Florida and a little less as you move northward up the map. Your mileage may vary! Since solar panels are no longer the expensive part of the system, add another string of 3 modules modules (John’s 305 watts special) for about a hundred bucks, each, for a little extra insurance and peace of mind. You won’t regret having “too much.”
(Update: Since this was written, the sun arose to a perfect angle on the Solar Shed’s roof. We’ve even had some unusually clear days. I isolated one bank rated at 2500 watts and actually saw 2475 watts on the meter at noon. Close enough! This will drop off as the sun continues toward a higher arc, but the days are getting longer so there will be plenty of power.
By: Neal Collier
Increased output from fractured cells
I looked for that article we were talking about, regarding fracturing cells for greater output. I found lots of articles on how fracturing can reduce output, but not the one for which I am looking. I did find a patent for manufacturing cracked cells to increase output.
Patent for fracturing cells. Link
Here are my observations on the subject. I test my panels with an ammeter instead of a voltmeter. A tiny section of a broken cell will give the same voltage as a full cell. Testing with an ammeter, I feel, gives a better indication of the power capacity AND gives a bit of a stress test. That assumes finding a sunny day here in the alleged Sunshine State.
Virtually all of my 34 watt, 6 volt panels have one or more cracked cells, at least in the later pallets. This worried me, at first, but I have come to embrace them and have enjoyed studying them. These tiles have much thicker glass than you find in standard modules. That allows a great diversity in crack modes without breaking the glass. The cracks that concern me the least are longitudinal ones across the fine silver traces between two main bus bars. There is no degradation at if the tiny silver wires are intact. If they are broken, the current still flows to the nearest bus bar. Outside of the main area, A crack with broken wires would eliminate a small amount of current from reaching a bus bar.
The ones that really concern me are the ones made by someone really serious about destroying a panel. These cracks fan out over the entire cell, looking like lightning bolts or, perhaps, a fern. The cell ends up in lots of pieces with the potential that several of those fine lines will fail, drastically reducing output. Given the choice, I choose the panels with the simpler cracks.
That being said, label-rated short circuit current should be around 7.5 amps, if I remember correctly. In practice, I have observed as much as 9 amps on these modules with multiple cracked cells. With such variation, I feel it is probably important to sort the panels for similar outputs, even as simply as Hi, Medium and Low, to maximize the overall production of power.
Have any failed? Hard to say, because I run in strings of 21 and they have bypass diodes. I do know that I had 2 with the edge delamination problem and their diodes were bad. 3 foot jumper cables allowed me to bypass those and continue operation with the rest of the string.
Some of the tiles were received with the glass smashed. That usually resulted from screws being left in the tile above. There were also some piles that were simply stacked too high and cases of probable malice. Not surprisingly, cells were damaged, too, when the glass was smashed. Usually, these modules work! I have one on the solar shed that has broken glass from a tree strike after installation. I tried to seal it with some of that miracle AS-SEEN-ON-TV clear sealant. It did not stay clear more than a few days and ultimately crumbled off. It turns out, though that the sheet of sticky plastic between the glass and cells maintained a seal and the tile with the broken glass still has good output, though in Phase 3, it is not presently connected.
This is not to say that all cell fractures are benign or beneficial. You’ll recall the panel I blasted with the shotgun. That did not really affect that module, but then it was already somewhat handicapped by having been bent and bowed by Tom’s front end loader getting “just a little too close.” (Right. Basic laws of physics indicate that two things can’t occupy the same space at the same time, for every action there is a reaction, and while matter can neither be created or destroyed it can be smashed to bits.)
While I am still a bit shaky on the physics of less-than-perfect solar cells, I am fully aware that my lights are on because around 350 previously discarded panels are keeping my batteries charged! If they work, use them, but please don’t take a hammer to them! Or a tractor.
By: Neal Collier
Basics
I started taking old radios apart as a very young kid, began my career in electronics at 16, was a licensed broadcast engineer at 19. That led to computers and all kinds of electronic gimcrack design. Having been making sparks for so many years it is easy to forget that some of the basic stuff might seem scary or mystical to folks just getting started. Today, let’s look at a couple of very basic and very important terms: series and parallel.
You will run into the use of series and parallel connections in solar power work, most importantly, perhaps, in the connections of the batteries and the PV modules. We’ll start with batteries.
Series: Have you ever seen a picture or video of a bunch of elephants walking in a line, trunks wrapped around the tail of the beasts in front of them? If you can conjure up that image, then you can get the idea of a series connection. Let’s say the trucking company just delivered 8 Trojan T105 batteries that Roberto sold you when you called Sun Electronics. What do you do with them?
They are 6 volt batteries, meaning there are 3 cells of 2 volts each connected in series. Now, 6 volts is not terribly useful in most solar power arrangements, which are usually 12, 24, or 48 volt systems on the DC side. So if you take 2 of the 6volt batteries you can make 12 volts. With 4 you can have 24 volts. 8 X 6 makes 48 volts. Easy, right? BUT, how do you connect them?
In series connections, you connect a cable from the first battery’s “+” positive terminal to the next battery’s “-” negative terminal. Just like the elephants, but not as heavy. Now, if you take a meter and put the black lead on the first battery’s negative terminal and the second battery’s positive terminal, you’ll find that the meter should read something over 12 volts. Ta Dahhh! You’ve just made a series connection. Add two more batteries in the same fashion and you have 24 volts. Add the rest of the batteries, trunk to tail, just like the first 4 and you end up with over 48 volts. If you put one in the string of batteries backwards, the 6 volts of that battery will be subtracted and the voltage will be below 48v. Pay attention to what you are doing!
Note: These cables need to be pretty fat because you may be dealing with hundreds of amps to feed your inverter. We’ll talk of that another time, but if you ordered a kit from Sunelec, you’ll have properly sized cables.
Parallel: Ok, you have 8 batteries and you have a 24 volt system. You placed 4 of your T105s in series to make 24 volts, but you still have 4 batteries left. What to do with them? Simple. Just make another 24 volt series of batteries right next to the first set. Make sure both lines have the “+” at the same end and connect those positive terminals together. Same thing with the 2 negative terminals. Now you have 8 batteries and 24 volts. This is called a series-parallel connection because you are connecting series strings of batteries in parallel to increase POWER (not voltage).
If you only have 24 volts and you can get that with 4 batteries, why do we use 8? We double the storage capacity this way. Let’s say the T105 is rated at a capacity of 220 amp-hours (AH). With one string we can multiply 220 AH X 24 Volts to discover a capacity of 5280 watt-hours. Let’s just round that off to 5000 or 5KWH (KiloWattHours). When we add the second set of 4 batteries, we double our storage to 10KWH. 10’s gotta be better than 5, right? You betcha.
Wait a minute, you are saying, I have a 12 volt system! You know you get 12 volts from two batteries, so do you connect 4 sets of two batteries? Exactly! With this connection, you now have 880 AH of storage and still have the 10KWH power capacity of the 24 volt system, just at a different voltage. If that’s confusing, don’t worry about it…it’s a good thing.
Here are some tips.
- Take a can of white paint and mark the POSITIVE corner of your new batteries. Trojans are dark red and the Sun batteries (and most others) are black, so the white paint will stand out better to avoid confusion.
- Have a multimeter. Even a cheap (or free with a coupon) one from your favorite Chinese tool store is all you need. Check each connection as you go to avoid sparks later.
- Wear safety glasses…some batteries can make sparks and hydrogen and under certain conditions that can be a bad thing.
- Cables that are too big are better than cables that are too small.
- Put shrink wrap or tape around the transition of where your cable goes into the terminal.
- Don’t make your cables any longer than they need to be. Big wire costs big money and long wire has more resistance.
- Put a coating of grease or battery spray on the connections to avoid corrosion.
- Cheap bolt cutter make dandy wire cutters when working with large battery cables.
If connecting that last cable to an inverter or other device containing a large capacitor, you WILL get a spark, so tap the cable to a flat spot on the terminal and not the screw stud (if applicable) to avoid making a weld burn that will make it impossible to tighten the battery nut. A better plan is to make the last connection at the inverter or fuse/breaker. Good Luck
By: Neal Collier
More Parallel and Series Stuff
The other day we talked about series and parallel connections of batteries. You know, getting 24 volts using four 6 volt batteries in SERIES and getting lots of amps at 24 volts by using 2 of those 24 volt strings (8 batteries total) in parallel. What about connecting your solar modules? Yes, it applies there, too. These roof tiles John is giving away, put out about 4 volts under load, so you use 3 of them in series to charge a 12v battery. I use 6 in series to run my 24 volt backup water pump. If you have a battery system and use an MPPT charge controller you might run 3 modules in series to get a good efficiency and stay under the 150 volt limit of the controller. If you are connecting a grid tie system with a string inverter, like a Sunny Boy, you may connect lots of full size panels for a voltage around 600 volts!Six 4v panels in series to run a 24v water pump located near my spring.
Connecting your solar panels in series is super easy and it saves money on wire, because several panels are connected using a single pair (positive and negative) of wires to the controller. Your modules probably have MC3, MC4 or Tyco connectors on them. Pick one connector on the first module and it will plug into the right one on the next module. The other one gets plugged to the next module. (If you use John’s free solar roof tiles, you might want to buy a sack of MC3 connectors because there will likely be some missing.) You can’t just do this forever because those panels are usually good for around 40 volts on the big”24 volt” panels and 18 or 20 on the “12 volt” panels. You could get some scary or damaging voltage added up in a hurry.Let’s say we have a 60 amp charge controller on a 24 volt battery. I don’t have particular specs handy but, generally, you’d say 60 amps X 24 volts = 1440 watts. Some controllers are real fussy about input wattage and even fudge a little bit on the specs. Some are rated higher and seem to just ignore a little extra power. Just remember 1440 for now.If you take three 300 watt panels and put them in series, you’ll have a max voltage of 120v, which is fine for this controller. Of course, 3 X 300 watts = 900 watts, so that being less than 1440 watts, you are safe to go. Sometimes, though, you have lots of cheap solar panels and want to get the most out of your BOS (Balance of System), so how many of these 300 watt panels can we use on the single 60 amp controller on this 24 volt system? Take your 1440 and divide by 300 and you get 4.8. You’ll have to round that down to a whole number, so that gives you 4 panels you can use.If you hook all of these panels in series, that’ll give you 160 volts on the input, so that is a no-no, as it exceeds the 150volt rating. TWO of those panels in series make 80 volts and that is ok. So if we take two in series and two MORE in series and connect the two sets in parallel, we can run 1200 watts (4 X 300) at 80 volts (2×40) into our charge controller and all will be good. If you have more panels you’ll have to have more charge controllers, or bigger ones, and calculate the optimal connection.TIME OUT! If you are getting scared or confused about 80 or 150 volts from your panels charging a 12, 24 or 48 volt battery…relax! MPPT controllers are magic! They detect the battery voltage and squeeze that higher voltage into your battery and get 20-30% more power out of the panels in the process. Don’t worry about how. Like I said, it’s magic, like using a 120 volt outlet to charge your 3.7 volt cell phone battery. Trust me.Now, there are exceptions to this general plan and that comes in the actual specifications of the controller you are using. A FlexMax 60 is rated at 1500 watts instead of 1440. This is from a real-world example at Stan-the-Hermit’s cabin. He has ten 300 watt PV modules and two 60 amp charge controllers. What he planned to do was put 5 panels in series on each charge controller. NO! Stan, don’t do it!!! The watts would be fine, but he’d have 200 volts going in, which would cause the smoke to come out. You never want to make the smoke come out of electronic stuff. (According to the Leo Ginn theory, electricity operates by the circulation of smoke molecules, so don’t let the smoke out.)The old 12 volt system was all wrong…and worked great.
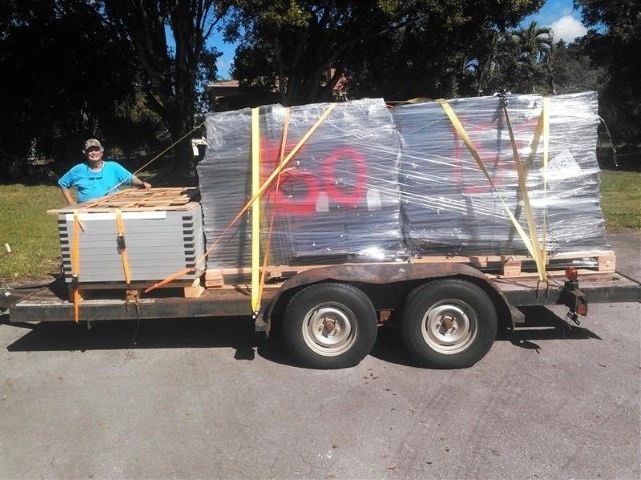
What should Stan do, then? I don’t normally recommend sacrificing the low light capabilities of MPPT charge controllers by operating all of the modules in parallel, but that is what he will do on the new system because he’d rather spend the money on his girlfriends than charge controllers (which are less expensive). 5 panels in parallel on each charge controller should work fine. There are MC4 adapters that allow parallel connection of modules, saving wire and making parallel connection easy, but watch out for the current capacity of the wire you are using. A single 10 AWG pair will safely carry 30 amps, but will lose a little power in the wire. I buy a 1000′ roll of cable (wire gets cheap on the big rolls) and every string gets its own wire. This allows me to isolate a string with a bad panel, if one should fail in my system of all recycled salvage modules.Stan poses with his stack of 300 watt panels and my load of solar roof tiles in Miami.
Is there any other way of doing this series/parallel stuff to save money? Yes! A SINGLE 60 amp charge controller will handle all of his panels if he goes to a 48 volts system, because it still handles 60 amps. At twice the voltage you have twice the watts. On the old 12 volt system, he’d have to have twice as many charge controllers to run with all of those new modules! He’s going to stick with 24 volts, though, because he already bought the inverter.Stan’s solar shed. 2 old men, one rickety ladder and 600 lbs. of panels.
Here is something important to note and it has to do with MIXING panels sizes. Normally, you’d buy all the same modules and assemble your system, but there are those of us who are scroungers and have all kinds of stray inventory. When connecting in parallel, you need to connect modules of the same voltage output. Don’t mix 12 volt and 24 volt panels and don’t mix 60 and 72 cell panels. In series, if you have panels of different ratings, there is a chance of letting the smoke out, but it is a sure bet that you won’t get the full added output from the modules. You CAN use a hodgepodge of panels, but group similar panels on their own charge controllers. For example, if you have four 270 watt 60 cell panels on one charge controller and four 330 watt 72 cell panels on another charge controller, then everybody will get along fine and the smoke will stay where it belongs.By: Neal Collier
Enough is enough? Nah!
Can you get too much solar power? Spend too much time on Pensacola Beach and you’ll think so, and have a red face to remind you. But, no, I am talking about photovoltaic power. In the case of grid tie, it has gotten to the point in some places that they are having to add battery storage systems to balance things out. The lack of battery saw the advent of the “duck curve” in utility power production. Look it up.
On your OWN independent power system, can you have too much? In phase two of the Solar Shed project, I had gobs of power on a sunny day, but not having enough battery and reaping only 10% of rated power on a cloudy day (we have them a week at a time in winter) made me wish for more power. Phase 3 gave me LOTS more power as the shed went from 32′ to 80′ of solar roof. Now, I am finding some interesting conditions to which I must adapt.
In addition to more power, now around 10kw rated, there is more battery storage and more on the way as I get to the detail work. The flooded lead-acid batteries are fine, now 3 days into a cloudy spell, though next year’s Phase 4 should keep them really topped.
What about sunny days? If the day starts out clear, I see what I saw on my solar boat expedition, the batteries start charging at the crack of dawn and ease into a full charge without any stress on the system. (When not on the boat I make a point of sleeping too late to see what my system is doing at dawn.) What happens, though, if the batteries are low and the day starts out cloudy and suddenly the clouds part to reveal full, noontime sun? OH CRAP! Think about that for a moment. 10kw at 48 volts amounts to 200 amps of charge current into my 635 amp battery. That comes to a C3 charge. Batteries love a C20 charge, or a rate of about 1/20th of the A/H rating of the battery. They are ok with C10, but they will use a little more water. But C3??? Bubble bubble, toil and trouble, to misquoteThe Bard. If you have sealed AGM batteries, they will soon die a horrible death at that rate.
My system has big knife switches I can pull to disable strings of panels in sunny weather, but that hardly seems a good way of doing things. You really want this to all be automatic. So far, the only issues I have had is when the batteries are topped and then the sun abruptly comes out. My inverter blinks the power off and back on! Why? Well, the charge controllers, which are set fairly close to the overvoltage trip on the SunKing 5548 inverter, take an instant to react to the increase solar power and the inverter trips. So, what to do?
The inverter is very adjustable, but everything is working the way it is set up and it really isn’t it’s fault, so I will leave it alone. BTW, you can’t buy a SunKing 5548…I built it out of the ruins of my lightning-killed previous inverter and some driver hardware I found. (Note that the Sun Electronics kits include the lightning protector that I NOW use.) The next place to look would be the charge controllers. I have 4 and three different models. I don’t recommend having a bunch of mismatched hardware, but I ended up with leftovers from evaluating hardware for my Solar Yacht project. As I noted in a previous blog, each has a different personality and each is adjustable. The two least active, get satisfied early in the day and shut down. They are not a problem. The twins are very active and are where the trouble originates. I dug through my literature stack and found the manual and went through the setups, dropping the maximum on one and dropping it some more on the other. I’ll know if this did the trick sometime in May, when the sun comes out again. I will just tweak them until the maximum charge current is at a rational level under full sun.
Are there other remedies? Glad you asked! Yes, there is a gadget called a Diversion Load Controller. I think these were first used with wind generators because you can’t just disconnect a windgen in a stiff breeze or it might fly apart. It used to be that the cost of solar guaranteed that no one would have too much solar power, but that has changed. You can use the DLC to dump power into a giant resistor, but that is wasteful. A better plan is to find a 12, 24 or 48 volt water heater element, as appropriate, and dump the excess power into your water heater. It just screws in. Everybody likes a free hot shower, right? That won’t do in my situation because, first of all, the Solar Shed is 200′ from my house and, second, my water heater is wood-fired.
The way I will use the DLC, if needed, is to pull in a relay that disconnects some of the PV strings.So, can you have too much solar power? I’ll let you know next year when Phase 4 brings another 5KW online, because, so far, I am reveling in what I have and adding more loads.
By: Neal Collier
I want to talk about the Solar Lifestyle and what that means. Elsewhere, I have given links to the Home Power Magazine Archive. That is a treasure trove of information and each issue is a time capsule of where the state of things was at that time.
Early on, solar panels were small and expensive. I have paid up to $11/watt for solar panels and I was not exactly a pioneer. Early adopters would have a single panel of maybe 30 watts and whatever batteries they could scrounge. Battery scrounging was easier back in the day, with a choice of Edison Batteries from the railroad or a forklift, NiCads from military surplus or L16s from department store floor scrubbers. They quickly found that an old car battery was not a good choice.
Systems were 12 volts, borrowing car tail light bulbs for lights and car radios for entertainment. If you wanted to get fancy you could use light fixtures from RV or marine sources. Primitive? Yes, but if you’ve ever lived with light from kerosene lamps, then you’d think it was great.
Inverters? What inverters? The first ones were square wave and didn’t get along well with some appliances, but even those were rare. The solar power was mostly used for light. You’d cook with propane and your fridge, if you had one, used propane too.
As systems grew, low voltage appliances were added. You could get a 12v coffee pot or popcorn popper at a truck stop. Specialty houses developed super efficient refrigerators with DC motors. John still sells the fridges because there are still a lot of low power systems out in the boondocks. People found that keeping up with the loads was a struggle for the solar panel. Maybe they’d eventually add more as the budget permitted, but most also maintained a backup generator, often a homemade DC rig using a gas engine and a car alternator. This was necessary, not only to keep up with the load, but because batteries need equalizing and that takes a lot of power.
Inverters evolved, rising in power and dropping in price. John’s recent email blast had an inverter at 1/3 the cost of a similar one I bought 30 years ago, wholesale, and the money was a lot stronger back then. They keep getting better and adding features. I just saw a brochure for the Midnite Solar MNB17-5 and I WANT ONE!
So, what is the state of the solar lifestyle, today? It is a wide range. Some folks are in pretty much the same place early USA users were 30 years ago. I know a guy who brings solar power to remote South American villages and John gives a lot of stuff to folks in Haiti, where just having a light and a way to charge a phone, a modern necessity, are luxuries.
I know a fellow who is a little more advanced than that, having to fire up his generator to run the water pump to fill his tanks. His stove and fridge are gas. Beyond that, he has CF lights all over the house and a big screen TV. If he has a big party and everybody falls asleep with everything turned on, he may have to run the generator to get the batteries back to speed. His batteries, by the way, were scrounged from a phone company for $5 each and have been in service with him for years.
Another fellow has a grid tie system. In his large modern, all-electric home, he is oblivious to any lifestyle changes. If he needs more than he makes, the grid supplies it, but as a rule, the solar power covers his needs. If the grid goes down, he’ll be in the dark like his neighbors.
In my area, we can’t have grid tie. One fellow uses a hybrid system that runs on solar, when he has it, and switches to grid when the batteries get low at night. That is an automatic feature of many modern inverters. A bigger battery stack would probably allow him to go full time off-grid. A lifestyle change would, too, but his house uses a lot of power for HVAC and there are always computers and home entertainment devices running. There have been a few lifestyle changes to maximize the use of the solar power. Big power users like the clothes dryer and the oven, for baking, are used during the day. When he had a single 5kw inverter, care had to be taken to not run the A/C, oven and clothes dryer all at the same time. Under pressure from his wife, he called Sun Electronics and bought a second 5kw inverter (I think he uses the Radian series) to run in parallel and now there are no restrictions on using stuff at the same time. If a hurricane takes out the grid and spares his array, he can conserve power and get along fine on solar alone.
On my system, at Phase 3, I am gradually getting to where I want to be, adding loads. I KNOW my wife is not going to deal with lifestyle changes, so I am working toward 100% off grid with operation being completely normal, except for the size of the power bill. In Phase 2, I had a crappy inverter with nowhere near the capacity it claimed, so I had to be very careful. I bought a 12kw inverter, a real one, that was going to solve all of my problems, but then lightning took it out. I am now running a 5500 watt inverter I built. I am still learning what it can do, wondering if it will handle the A/C load when I bring it on.
Battery life was a problem with Phase 2 in cloudy weather, but I have added batteries and incorporated other sources from my 2 electric farm trucks and my electric boat. That, along with an extra 5kw of solar and the batteries have been fine, even when we go for days without sunshine.
My goal is to have no restrictions on my use of solar power. Current loads are all the lights, computer, satellite, TV/DVD, 2 refrigerators, a freezer chest, 2 coffee pots, microwave and dishwasher. If the grid goes down, the clothes dryer and the stove won’t work, but I can get by without them. If I have any problems with the A/C then I’ll just have to build or buy a bigger inverter, won’t I? Another option would be a second inverter just for HVAC. Out at the Solar Shed, I run all manner of power tools, including a 2hp air compressor and a welder. It doesn’t sound like I have too many limitations, does it?
So, you see, today the solar lifestyle is only limited by your budget and covers pretty much the entire evolution of home solar power. Solar is now the cheapest form of power generation. It is only the up-front cost of going solar that holds us back, and John is doing his best to make that cost ever-lower. Looking at some of his kits, I am wondering if maybe you could borrow money to buy the kit and pay it back with payments similar to what you’d make on your power bill. Better yet, save up and then give the power company the boot.
(Update: I did get the upstairs central a/c connected and it did not work. There was too much surge load at startup with this 30 year old machine. I installed a soft starter on the a/c compressor and now the
18,000 BTU compressor works without so much of a blink, even with other heavy loads running. Trademarked names for these gadgets include Smart Start and Sure Start. They are not cheap, but cheaper than a bigger inverter!)
By: Neal Collier
Cut Out The Middleman
Utility power began with a fight between AC and DC systems. Thomas Edison promoted DC distribution. His ex-employee Nikola Tesla, the real Tesla, came up with the AC system for George Westinghouse. Both sides advertised how dangerous the other way was! What a way to promote a new industry!
Power stations were not the huge plants of today. They’d be tucked into a building on a corner and lines would run out a few blocks in each direction. There was no grid. The first microgrids?
DC lost out because you just couldn’t send it very far without a voltage drop. AC could counter the drop with transformers to boost the voltage. With this extended range, The power plants could be bigger and send the wires out further. Plants were also interconnected and the grid was born, making for more reliable power…except for country folks.
Country folks had to make their own electricity, usually using a gas generator like the Delco Light Plant, a Jacobs or Wincharger windmill, using battery for storage, or even a small hydro plant. Henry Ford had a hydro plant on his estate. These systems were the forerunners of the independent power plants you and I are building with the clean and quiet solar systems. They fell by the wayside when the Rural Electric Administration began subsidizing power cooperatives for the rural areas.
The power companies started dabbling with solar when they saw how many of their customers were adding solar. Prices dropped and then solar became cheaper to build and WAY cheaper to produce power, even when they had to buy batteries, which are now all the rage. The power companies began building solar farms. Then they started a campaign to discourage or even prevent US from building solar capability for ourselves. Recent power industry sources now openly admit this.
Here is something a little funny, though. They seem to be on the verge of dismantling the grid system, at least on a small scale. Recently, an Australian power company was faced with upgrading a line to the boonies. Instead, they cut that project and installed small solar plants at the far end of the line. The customers saw no difference and the power company both saved money and still retained control of the power. You have to wonder why the ranchers didn’t just make their own solar plants and be done with power bills. Closer to home, a long line in the Appalachians avoided an upgrade by adding battery. This morning, I see a report that ConEd, Mr. Edison’s company, is working on alternatives to upgrading lines that are struggling under peak conditions. It won’t surprise me if they eventually add solar in the mix. Puerto Rico’s thoroughly screwed up system seems to be moving to solar and microgrids.
So, the question is, if the power company admits that solar is the way to go and solar is cheaper than conventional generation, why isn’t everybody doing it? Probably because of the upfront costs or maybe the word just hasn’t gotten out that the upfront costs aren’t that bad. John’s sales guys have payback examples for their package systems. Take a look and you may decide it is time to cut out the middleman, or at least have some backup and independence in the event of a utility power failure. My lights don’t go out. Ever. Not for 25 years. NICE.
By: Neal Collier
New System, Problems, Solar Daiquiris
Stan-the-Hermit called Friday, needing some bits and pieces to finally get his 24v solar power system running. He’s had his panels for well over a year, having accompanied me on my final run to John’s old Miami Gardens warehouse. They’ve been mounted for months. He left my place happy with an armload of switches, breakers, fuses and solar wire. If I had more friends like Stan I could open a solar hardware store.
I expected to receive a triumphant phone call within 24 hours, but that didn’t happen. He was in a panic when he called Saturday. He’d hooked it all up right, he claimed, but the voltage on the batteries had gone from 17v down to under 13 overnight. What could be wrong? The answer is right there, but let me give you some background.
A while back Stan told me he’d found a Great Deal on some used batteries that came out of a motor coach. “Great Deal” and “used batteries” can, but do not always coincide. Given the voltages he quoted at the time it was clear that they needed a good charging and equalizing and that one might have a dead cell. He did not charge them, resulting in 4 six volt batteries adding up to 17 volts when he connected them in series. I suspected I knew what the problem was and asked if he had read the manual.
“I hooked it up right,” was the answer, but not to what I had asked, so I asked twice more. No, he had not. I braved 4 miles of bone-crushing gullies, terraces and switchbacks to get to his cabin to take a look. He had hooked it up right, as he’d claimed, but it was settled in on 12.8v, which is fine for a 12v system and a real problem for 24v. He could not find the manual, of course. I suspected the charge controller had autodetected the system voltage as a well-charged 12v system and proceeded to run the battery down to 12v overnight.
We hot wired two panels directly to the batteries to get them charging. I left him with instructions to let them get up to a bit over 30v so they could equalize and desulphate and to keep an eye on the water levels. Batteries that dead should have taken a few days, but he was impatient. By Sunday morning the voltage level had come up to 27 volts and he was ready to hook up the charge controller and inverter. That is not what I had prescribed, but it would not hurt anything and might save some damage that could occur if he went away, leaving the batteries unregulated.
I stopped by about 6:00 Sunday afternoon and Stan was a happy camper. I poked at the charge controller and saw that the battery was still taking
50 watts, even as the tall trees up the valley slope were shading his panels. He’d had some of his inner circle over and they’d inaugurated the new 24 volt power system by making daiquiris! It was clear they’d been successful in that endeavor.
He still has 8 more panels and another charge controller to connect before it is done. When he moves his Flexmax 60 over from the 12v system it will be just the ticket for getting those batteries equalized because it can be manually set up for a thorough job, unlike a lot of other controllers that give a mild boost on a daily basis.
By the way, I found the manual online and his charge controller autodetects a 24v battery in a range of 18-30v, so it really did think it was dealing with a 12v battery. Whether you buy your batteries new or used, charge them up before storing and again before putting them into service. Just sitting around discharged is bad for them and confusing to a charge controller. RTFM (read the fine manual).
As for what you use to test your new power system, a blender is as good a start as any.
By: Neal Collier