
Quick and easy emergency solar
John and I have been talking about using solar power to survive in relative comfort after a storm. In my efforts to mostly eliminate my old 24v solar power system I realized I was putting together what would make a good example for survival power. Why did I not eliminate the 24v system completely? My solar electric launch, Sun King, is in the Solar Shed and needs to be kept charged up in the dark shed. In return, the onboard inverter runs my shop air compressor. Anyway, the old control board is coming down as my control room gets walls and a bit of civilization. Yup, Man Cave.
First, let’s talk about panels. Are your panels going to survive the storm? My Solar Shed PV shingles are rated for 60 mph, so there is a real good chance that winds from the right direction could do away with some or all of them. What about conventional panels? Believe it or not, there have been post storm studies to see what stayed put and what blew away. Click on the link for some interesting reading. https://rmi.org/wp-content/uploads/2018/06/Islands_SolarUnderStorm_Report_digitalJune122018.pdf
What I am proposing here is not storm resistant. In fact, my plan is to unplug and unbolt the panels and store them in a safe place. Under the house? Under the bed? I go for under my pickup truck which gets parked in a gulch, the panels duct taped into a heavy mass. Heck, we’ve even parked airplanes down there. The winds always blow right over anything we put down there. This won’t work if you are a coastal dweller. Maybe if you are a coastal dweller you should stuff them in the minivan and be somewhere else when the storm comes!
So, imagine the storm is passed and the winds have died down. Your house is livable, but there is no power. You want some lights and the fridge running at least. What I am suggesting here won’t run your central air, but if you have a 5000btu window unit, it will run and make a big difference, despite the small size.
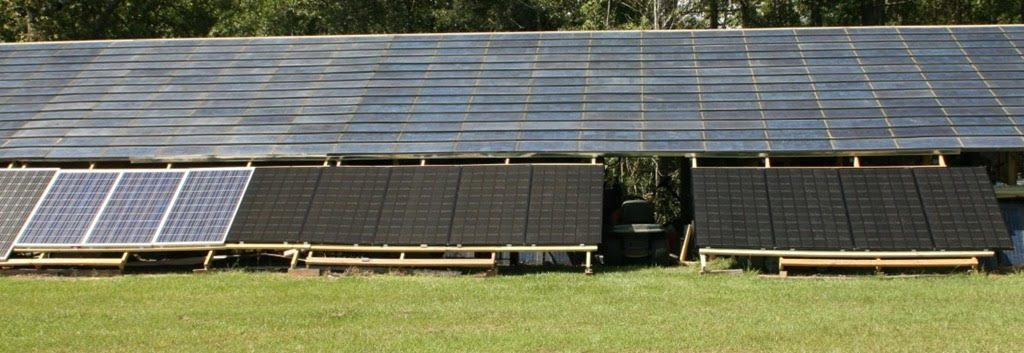
First, retrieve your solar panels. You can make some temporary mounts by nailing up some 2x4s. There are usually plenty of them from houses that blew apart. Heck, you can even lash up some saplings using those Scout skill you got when you were 12. You just want your panels to be reasonably stable. I have put some flat on the ground for over a year. Whatever works. In this case, for my boat charger, I ran 3 treated 2x4s diagonally, nailed to the bottom of the solar shed eaves. Deck screws or ring shank nails are good about staying where you put them. I then put crossbar 2x4s spaced for the length of the panels.

If you routinely have some strong winds you might want to drive some angle iron into the ground to hold down the bottoms.
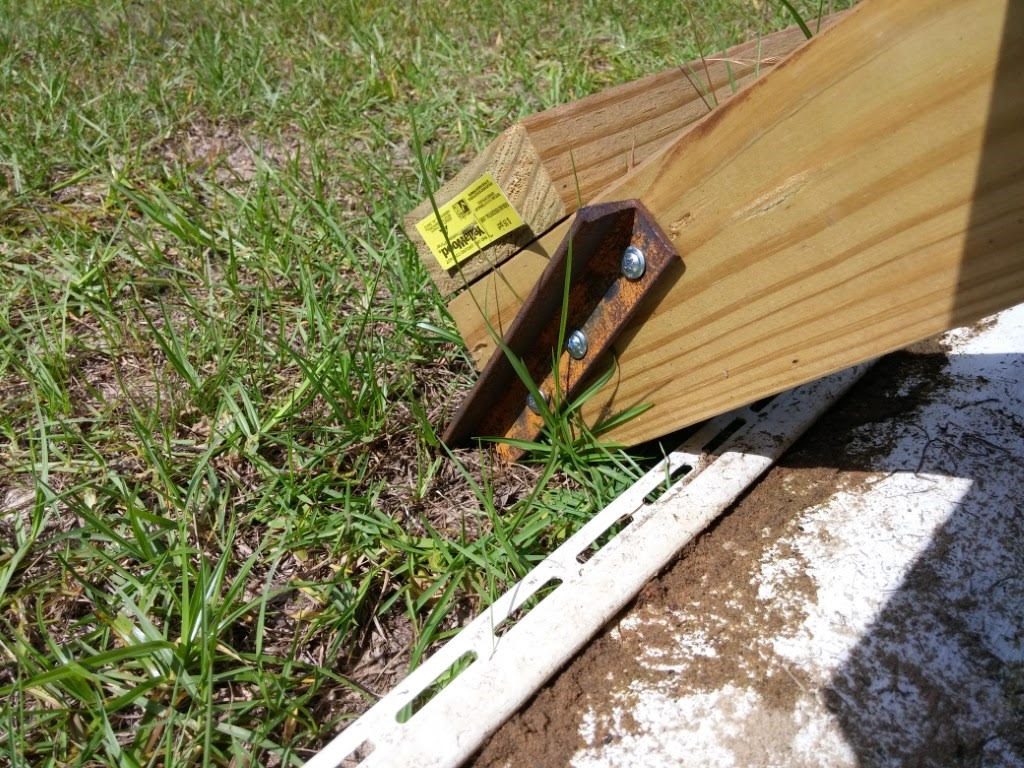
The panels, I use 3 to the rack, can be held in place with aluminum angle, about 2” lengths, and self drilling screws. I use longer screws in the wood. Don’t have a power screwdriver or cordless drill? How can you live that way???

You could just as easily screw the boards to fence posts or lean them against a dead car, in a pinch. Not shown, I also screwed the panels together.

Finished product. Well, it needs paint on the wood for protection if you keep it long term.
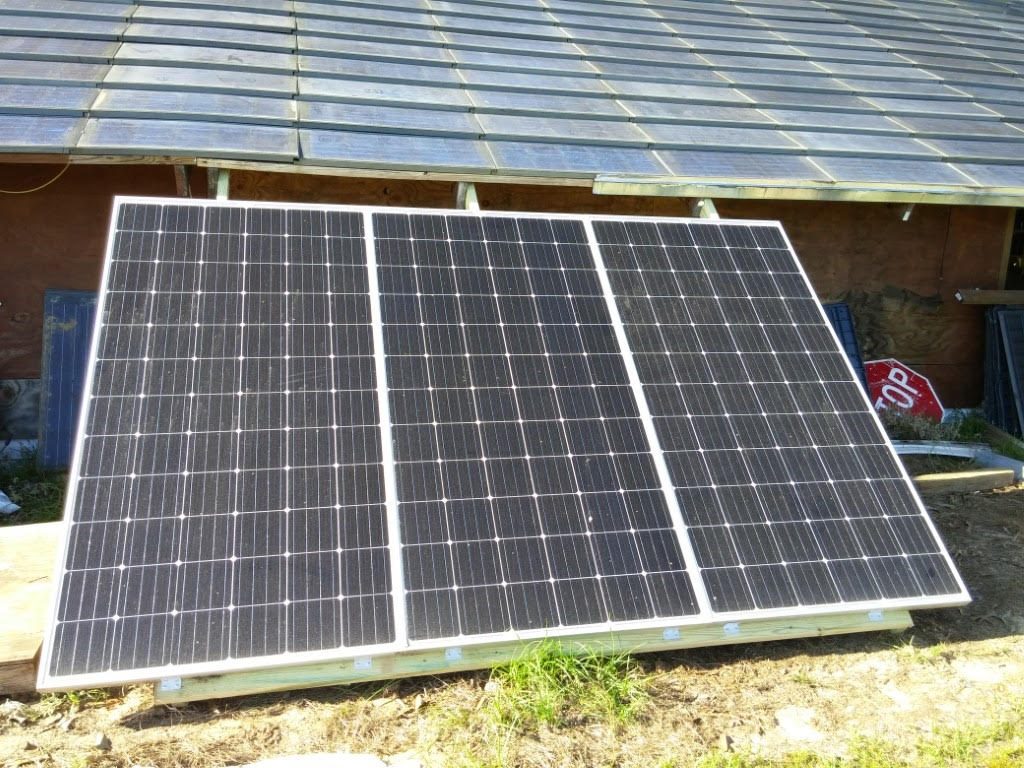
You can see I still have 6 more panels to put up on racks, at this point. The 1500 hp fan has not blown over the panels just leaning, so I am pretty confident about the ones on the racks.

Out of the weather, I used a scrap of plywood, 2 common fused disconnects, like you might use for an air conditioner compressor, and a cheap charge controller left over from evaluations for my Solar Yacht project. It’s a decent little controller, but the displays fail over time. ALWAYS connect the battery first so the controller can determine what voltage you are running, and THEN connect the panels. Although they look nice and professional, you don’t need preprinted placards to label things. A felt marker will get the message across. Ok, ok, I will put some printed labels up. There are websites and programs that let you design and print your own labels, signs and placards. You could premake the whole assembly on the plywood, with quick connectors and keep the unit in a safe place for rapid setup after the storm.
“Goof Off” and fine steel wool will clean off that tacky Magic Marker labelling when you get some proper decals.
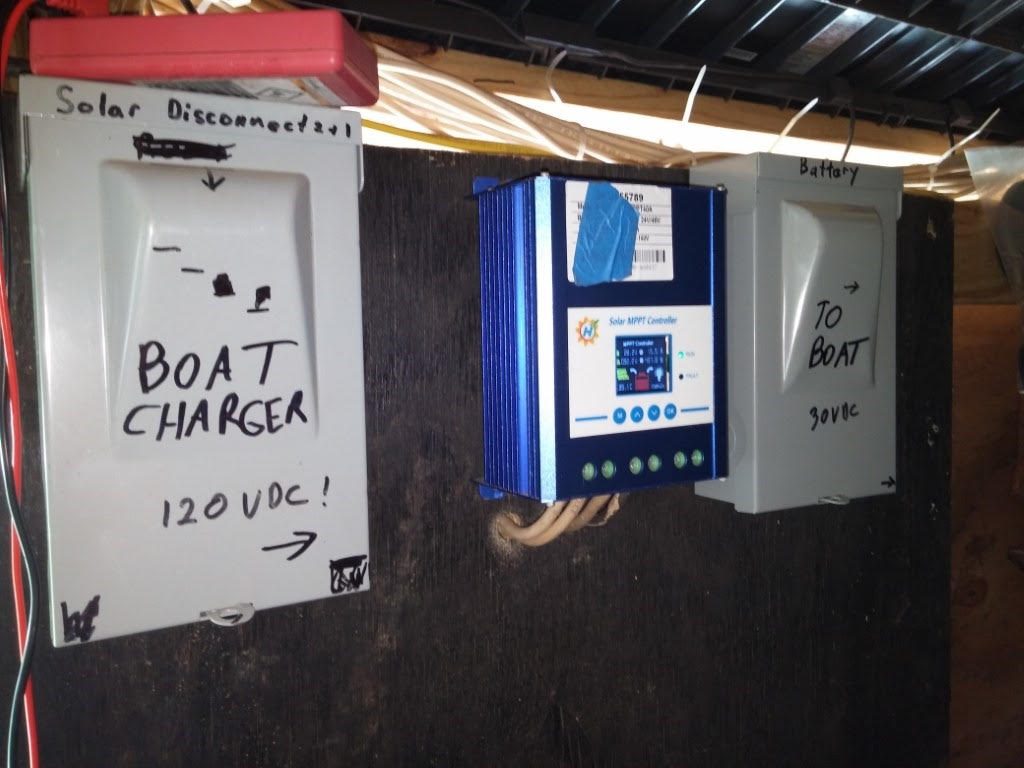
If you are the suspicious type, you note that you don’t actually see any batteries. They are in the boat, 350amp-hours of 8v golf car batteries. This is actually how you might do batteries in a survival situation. If you had a battery bank, it is unlikely that it went away. If not, there will be cars, trucks, tractors, etc that have been crushed or flooded. Maybe your own. They can be a source of batteries. ASK, if possible. Don’t get shot for taking a battery! In this case, the boat has batteries and an inverter, so I am good to make power. I have a 2500 watt inverter for my 12v truck, when it is running. I have run a fridge with that and, more importantly, a coffeemaker, but you don’t really want to leave your car running. You did fill the tank before the storm, didn’t you? But, you still don’t want to leave it running. This little rig pictured above can charge the battery in your vehicle to run the inverter to run the fridge and Mr. Coffee. Microwave, too!
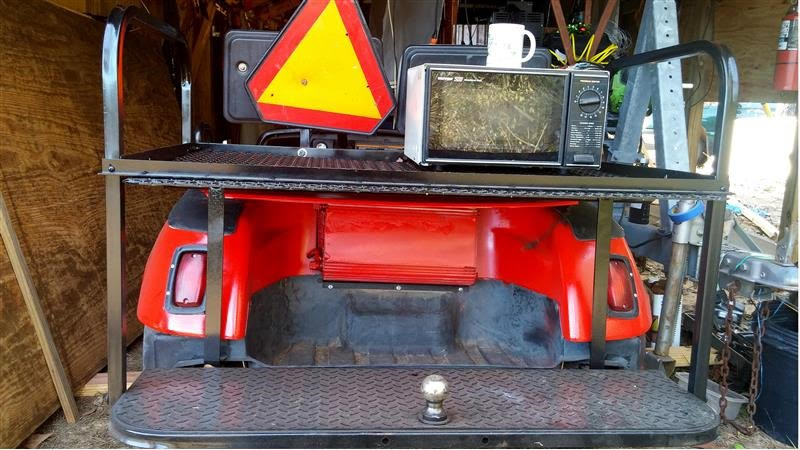
A golf car is a perfectly wonderful survival aid. Not only does it provide a LOT of battery, you can bolt on a 48v inverter for the newer ones (there are 36v inverters, but they are harder to come by) for portable power. There’s the transportation value, too. This same charging rig will automatically adjust to 48v operation. NOT ALL charge controllers go up to 48v, so check before you buy.
This 2500 watt modified sine wave inverter got painted red with the rest of the car, and ran the microwave just fine.
Oops, reality check, yeah my 2500 watt truck inverter will run those appliances, but what about the charging? 3×270 watt panels /12= is 67.5 amps. It is a 40 amp controller. Use just two of the panels instead of 3 and you are good. You math geniuses will note that two panels can produce 45 amps at 12v, but they won’t at that angle and if you use a pwm controller you’ll not get even close. On the 24v system it has room to spare with all 3 modules. Don’t forget to calculate this stuff and don’t forget to have all of the tools, fasteners, cables and connectors that you need. A dry run drill is a good way to check. Plastic totes are good for holding the kit, less panels and 2x4s.
OK, so what does this cost? I scrounged most of it. I had the disconnects left over from something else, but I think they are maybe $10 at Home Depot/Lowes. The charge controller is an MPPT unit that I already had. Cheap pwm controllers are readily available for a throwaway system like this, or you can get an industrial strength controller for maybe $500. Your choice. In a pinch, if you match the panel voltage to the battery voltage and keep the load up, you can get away without a charge controller, but be forewarned that inverters can be fussy about their voltage range and batteries can be killed from over or under charging. Batteries, ideally, are something you already have in a car, boat, tractor, golf car, RV etc. You might get an inexpensive survival inverter, even if you have a nice one in a PV power system. We are talking about backup, here. A fridge and a microwave WILL run on the so-called modified sine wave models. John does not have the absolute cheapest inverters, but he has good prices on inverters with a good track record. MOST cheap inverters you see on ebay have drastically exaggerated ratings. If you don’t have any of this stuff, the Puerto Rico kits that John put together after their storm are pretty much everything you need at a great price.
Ok, how do you get the power into the house? If you have a generator plug and a transfer switch you just plug it in with an appropriate cable. The circuits on the transfer box need to be within reason for the amount of power you have. Forget the clothes dryer, range and central air. Concentrate on lights, microwave, fridge and coffee pot. (Coffee makers also make hot water for Ramen noodles, soups, teas, etc.) DON’T have the generator plug? Use a HEAVY DUTY (12 ga) extension cord and run it in through a window. Use an outlet strip to plug in the fundamental loads. OR don’t use the outlet strip, which guarantees nobody will run Mr. Keurig and the microwave and fridge at the same time, possibly blowing a fuse and ending it all. Umm, you do have a spare fuse, don’t you?
OK, these are just some things to think about as Hurricane Season approaches. There are so many ways to prep for power after the lines go down!
East and West are Subject to Wandering
Archæologists have discovered that it is not just modern mankind that buries its dead with their feet to the east, it has been going on for a long time and in a lot of cultures. They have also noticed that all of the bones in a particular ancient burial ground are buried in more of a loose version of east or sort of east, rather than on a true line. The reason, they conclude, is that the sun is on a different arc at different times of year, so folks got buried according to where the sun was at the time. The ancient ones didn’t have smart phones with a compass app.
I spend a lot of time with archæologists and never really thought much about that business of a wandering east and west until I got serious about solar. The airstrip at my farm heads east-west along a section line and I just sort of expected the sun to rise at one end and set at the other when I installed my panels on the northern edge. Sometimes it does. Right now it rises over the blacksmith shop, which is more east-north-east than east. Early in the morning, instead of those first rays hitting my panels and filling my starving batteries, they are lighting up the backside of the Solar Shed! Man, that sucks. Summer is supposed to be that special solar time of the year, with its long days and high angles. Turns out, not so much.
Well, no worry, early morning sun is at low angles and doesn’t give you much power, anyway. Right? Tell that to the batteries.
If Only the Sun Flew Right Down the Runway—Look at the Offset of the Plane’s Shadow in this Afternoon Shot
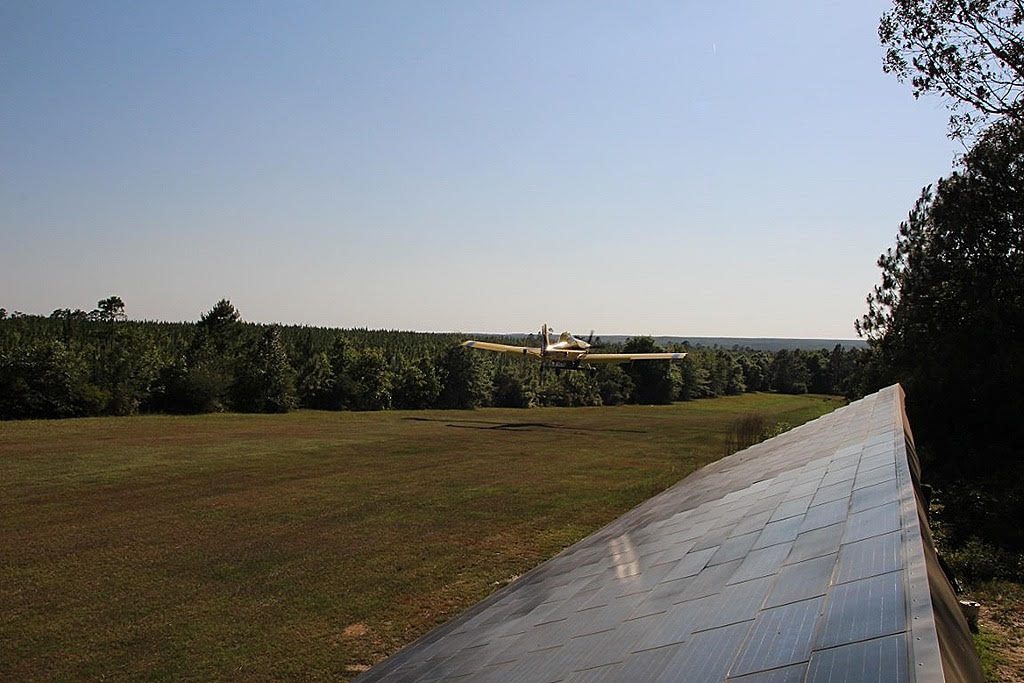
Then it gets a little higher and what happens? THAT tree blocks the first two charge controller groups of sun until noon. If the sun flew right down the runway, chasing the Airtractors, all would be well. To make matters worse, the big oak has grown, moving closer to the solar shed. Yeah, I have trimmed it, but there are limits as to how high I will climb a tree with a heavy chainsaw. I’m not nearly as immortal as I used to be. The solar shed is also 65’ closer to the tree, as it, too, has grown. The crown of an oak behind the shed is growing and threatening to shade things and some pines on the west end, though well away, are catching the afternoon sun as it arcs back to the north.
The moral of the story is to put your panels well away from the trees. Even if you are a tree lover, some must die. Best that this happens before you build your array. Why don’t I cut down the trees? Murphy’s Law says that anything that can go wrong, will. Neal’s Law says that if anything goes wrong, it will go wrong on the most expensive stuff. Neal’s Corollary says if anybody has a video camera running then the first two laws are a sure bet. Go to youtube and look up videos of people cutting down trees!
There are ways of dealing with trees. The expensive way is to hire a pro tree crew to come in and take the tree down, starting from the top. This is expensive, but usually safe. Another way, and I get this idea from nature, is to just kill the tree and the limbs will start falling in small pieces, straight down until you have a manageable post. I have 3 trees I am working on now and they are taking their sweet time about dying. Take a chainsaw and “girdle” the tree by cutting all around, just through the bark and the layer that passes water and nutrients up. That didn’t work. Take a weed torch and burn the bark all around. That didn’t work. Drill a series of one inch holes around the tree and pack them with salt. That didn’t work. Super Oaks! Fill the holes and grooves with Roundup.
One of the trees is starting to look a little sick. Eventually it’ll get the job done and the trees will slowly crumble. Don’t worry, tree lovers, I’m a tree farmer and I’ll make more…just a little further away. So, the moral of the story is that you shouldn’t just kind of nestle your array in with Mother Nature, because she will try to keep the sun to herself. Plant your array clear of trees to the south, east and west and maybe just a bit to the north. Stand in the middle of where your array will be, facing south. Hold your arms straight out and bring them as far back as they’ll go. That angle back should make a pretty good template for your arc of clear space.
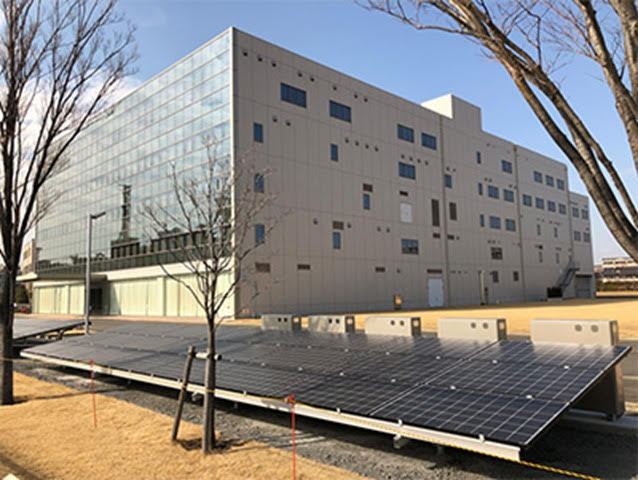
And don’t think that planting trees in front of your solar panels will make them twice as green, like these folks did in Japan! How well do you think this is going to work out? Photo is from Kyocera.
–Neal
Think Outside the Box
The purpose of this post is mostly to stimulate thought and open up some possibilities for you. Many folks would find these ideas impractical or even impossible if you live in an apartment or have a strict homeowners association. Wild stuff, but maybe there’s a mad scientist among you who could make it work.
If you know John Kimball, Sun Electronics’ fearless leader, he has been on a crusade for decades to bring affordable solar power to the people. As far as the PV modules go, he’s there. Solar panels are no longer the problem. I have noticed pricing on charge controllers dropping and pretty soon that will no longer be a huge part of the equation. With inverters, the problem is that there is such a flood of cheap Chinese inverters that you might be tempted to go with one of them, whereupon it is quite likely you’ll find you made a mistake and end up buying the more expensive model, too. What I am looking at as MY biggest issue in my personal solar power systems (yes, plural) is storage.
Where do you store your power? In a battery, right? Utility scale battery and electric automobiles would probably drive the price way down, but on the other hand there is a huge demand. LOTS of battery research is going on and someday someone will come up with the super cheap-but-good battery. In the meantime, there are OTHER possibilities to store energy, though not necessarily electrical energy.
Big utilities have used a couple of neat tricks over the years Hydro plants just let the water back up behind the dam, then run it through the turbines to make electricity, as needed. Some utilities not normally considered as hydro, take their excess electricity to pump water to a lake on a hill, then run it back down the hill through a turbine when they don’t have enough power from their regular supply. Some are now using pumped storage with solar, to keep the lights on at night. Now, I am thinking that this would be impractical for you and I, given the space required for a couple of lakes and a power station.
Another big utility trick is to pump air into underground caverns, using surplus power, and then letting the compressed air run a turbine to make extra power when needed. Again, that’s not going to be good for most of us. I don’t know about you, but I am pretty sure there aren’t any underground caverns where I live. This is not to say that compressed air could not be used, and in more ways than you might think. Let’s say your solar power system has your regular battery topped up for the morning and not much is running in the house, why not have it burn off the extra power from your panels by running an air compressor? For this kind of duty you’d need a pretty tough compressor, but they are out there.
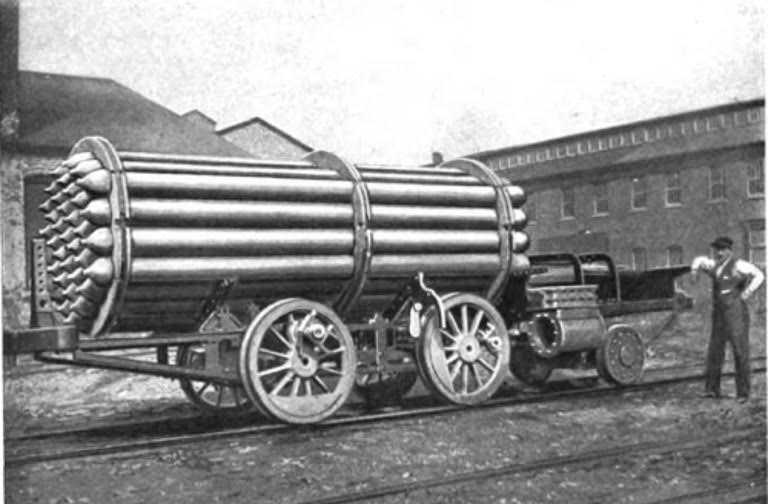
You pump the air into a huge pressure tank (huge being a point of inconvenience to many), perhaps one like they use at those propane storage yards. Such a tank would be expensive, if bought new, but you can find amazing values in industrial surplus. You might find one for scrap value. When the sun goes down and the regular battery is getting low, you send the compressed air to an air motor. You may not be aware of these, but they are very common in industry and can be very durable. The air motor spins a DC generator to charge your batteries. This is dirt simple to do, but huge. Far fetched? Under the city of Paris, France, there is an abandoned network of pipes from an era where a central compressor station transmitted power to businesses all over the city, powering industry!
Google it and read THIS article. You can store a lot of power with compressed air. Even run a car!
There are side benefits to consider, too. When you compress any gas it gets hot. This is how heat pumps work. If you put your hand on the top of a running compressor then you will quickly notice it is quite hot as you pull your blistered fingers away. If you put that freshly compressed air through a heat exchanger you can heat your domestic water supply. On the reverse side of the process, when the air expands through a motor it comes out quite cool. The air can be run through a heat exchanger for storage, or exhausted directly into a room to keep it cool.
Ok, that’s pretty off the wall stuff. How about one that is so simple, even your cat understands it: thermal storage. The cat finds a spot where the sun shines through the window on a cool morning and is warm and cozy. John sells a thermal solar water heater that mounts in a sunny spot. It uses some super simple, but highly efficient technology that will do a dandy job of replacing the electricity or gas you use to heat your bath water or if you can use several of them and greater storage, you could probably do a good job of supplying water to a hydronic home heating system. You can run the hot water through pipes embedded in your slab, through baseboard heat exchangers, or through a radiator inline with your central air handler. Heating water directly from the sun bypasses the solar electric, charge controllers and batteries. Storage is just an insulated tank.
I have some other mad scientist ideas I will share with you as information is firmed up. A friend dropped off an extra pallet of solar modules and microinverters he had to use in the ongoing solar air-conditioning project. In conjunction with that, I’ll have some gear available to test some of the old wives’ tales about what you can and cannot do with certain pieces of equipment. I don’t think this will turn out quite as destructive as the time we used a 12 gauge shotgun to blow holes in a panel (it still worked), but there could be smoke.
–Neal
Microinverters!
What is a microinverter and why in the world would you want one? The first answer is easy. Whereas a regular grid-tie inverter takes the power from a bunch of panels and injects it into the powerline, a single microinverter bolts onto the back of each panel. The solar panel’s MC4 connectors plug into one side of the microinverter and a connection to the 240 ac power line plugs into the other side. This makes setting up a grid tie system very easy, though in most cases you still have to have the disconnects and special metering arrangements made with your power company. Look there’s a box full of microinverters! A company called Enphase is the big player. Their fuzzy “e” logo is very disturbing to someone like me with eye problems.
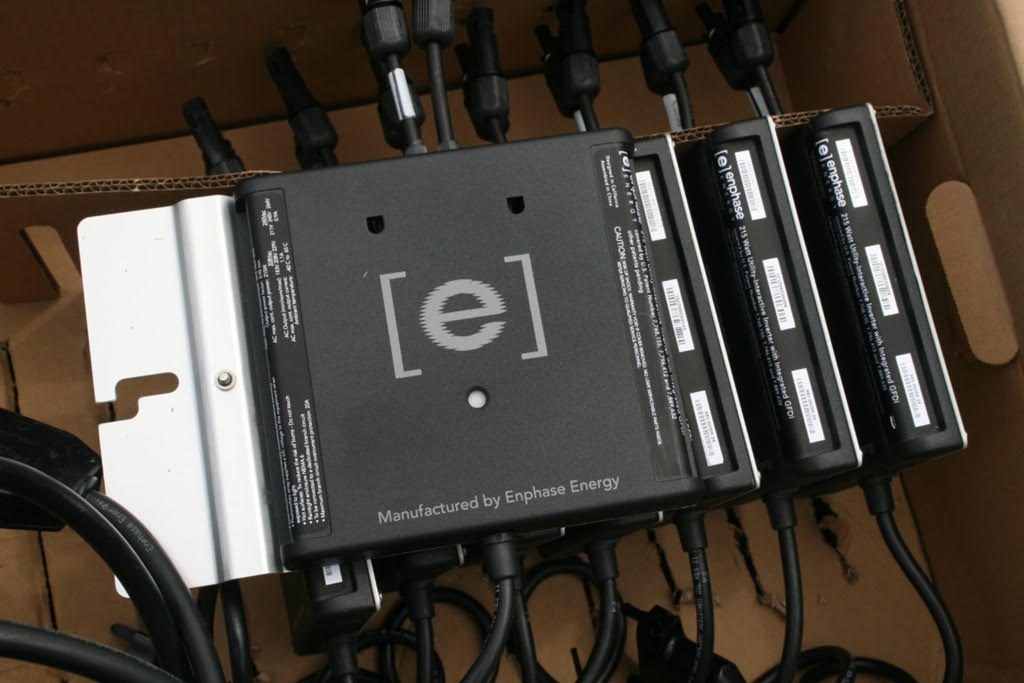
The problem I saw with them when I first looked into the matter was that each micro inverter was close to $200, or about double or triple the price of a typical solar panel from Sun Electronics. Then there was the power output. The M215, shown above, only outputs 215 watts. Hook it to a 300 watt panel and you still get 215 watts, so you are wasting some of your power at peak times. Enphase makes the argument, though, that you get more consistent power output over the course of the day. It is kind of a dubious argument, but there is some merit to it in special cases, such as a project I am currently working on. Shortcomings aside, there may be some good to come of using these. For some reason, tons of them have been dumped, brand-new-in-box, onto the open market at dirt cheap prices, like around $30. (A word of warning, though, make sure you can get the cables and beware of the price of cables! ) At that price it gets interesting, but you need to use caution. A friend drove down from South Carolina and dropped off a case of the M215s and a pallet of panels he wanted me to try. The M215 uses a lower voltage than the newer models, so he made sure he brought me a pile of 60 cell panels. Turned out they were really 96 cell panels, shipped by mistake. He had not even looked at them. I keep telling him to buy from Sun Electronics, but he doesn’t listen! The 96 cell panels put out nearly 60 volts whereas a 60 cell panel is usually around 36, open circuit. 72 and 96 panels are now the norm and I guess that is why the older microinverters are on the surplus market. All but two of those 60 cell panels are equipped with microinverters. The blue ones are 270 watts and the black ones are 300 watts.
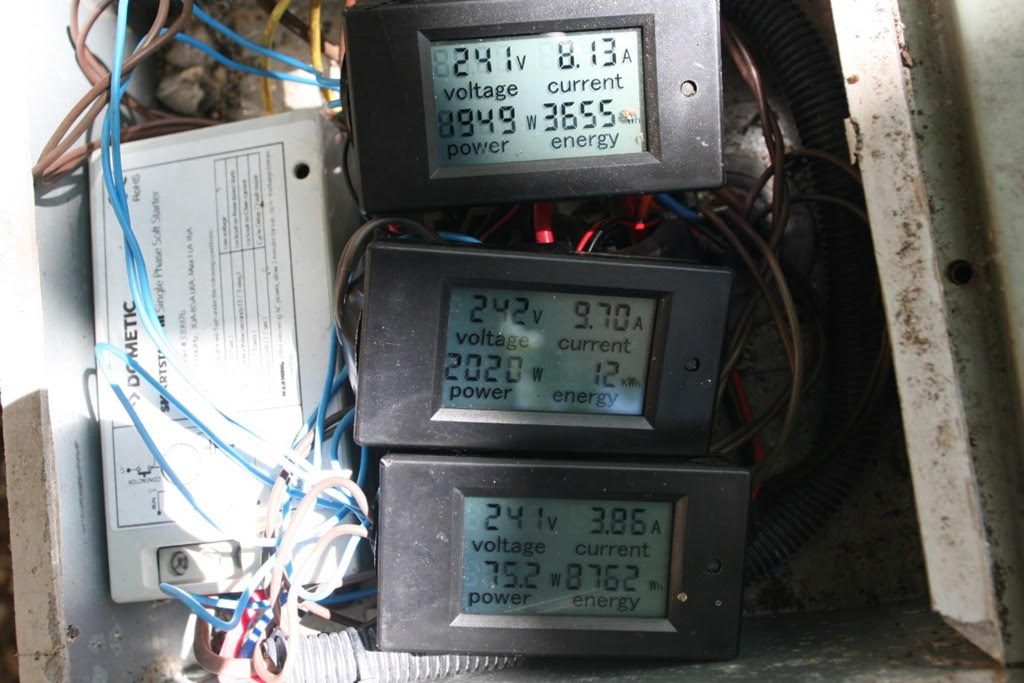
Now I mentioned that having that controlled output could be useful. An experiment that we are running involves connecting the microinverter’s power line to the MOTOR side of the contactor in a central a/c compressor. I have 10 microinverters connected to my a/c. What happens is…nothing, until the thermostat clicks the contactor starting the a/c and connecting to the microinverters. After 5 minutes, the sync light comes on and suddenly the a/c is using very little from the powerline. Huh? Okay, here’s the deal, a grid provider does not allow grid intertie, but mixing the power from the microinverters with the power from the grid, you get to use the solar power without backfeeding to the power company. So even though we are connecting grid intertie, there is zero flow and nothing for their electronic meter to report. This, of course, assumes you have selected an amount of microinverter power that does not exceed what the a/c is consuming. Here’s a picture of the meters inside my upstairs a/c compressor. The bottom meter is the power line. Lower left corner of it shows the a/c drawing 75.2 watts. Of course, the a/c needs more than that. The middle meter shows the power actually being consumed by the compressor and the top meter shows what is coming from the microinverters.
Because the microinverters take about 5 minutes to sync with the line before providing power, you want long run cycles. This scheme works best if you use a programmable thermostat to cool like crazy during sun hours and then ride through the night on the stored cool. At the present, this project is not on the grid power line, but on my solar microgrid. Yes, the microinverter WILL sync to a good sine wave inverter! It is taking a lot of the load off of my smallish inverter and definitely letting my batteries charge up quicker during the day. If you try this with your a/c on the grid, is this going to save you a ton of money? Probably not, but it is a fun experiment. I have a few more microinverter experiments I am working on and I’ll let you in on them, soon. If you want to try some of this stuff for yourself, John’s guys can fix you up with some super deals on 60 cell modules—Neal
Power Use Optimization and Free Energy Storage
In my last post I talked about some seemingly off the wall, but doable, energy storage contrivances. As for the compressed air storage, apparently some pretty clever people have already thought about this. Follow this link to a pretty thorough discussion of the subject.
There are some pretty neat pages at Low Tech Magazine and No Tech Magazine. Speaking of energy storage and No Tech, how about storing energy with NO equipment? This is coming out of the solar air conditioning research. First, it is a no-brainer to state that your solar electric electrical system works best on a sunny day, right? Well, fact is, it doesn’t really draw in useable energy at night, even though a full moon might make the green light come on on your system. So, it makes sense to use the energy when it is being made, rather than tax the batteries so severely at night.
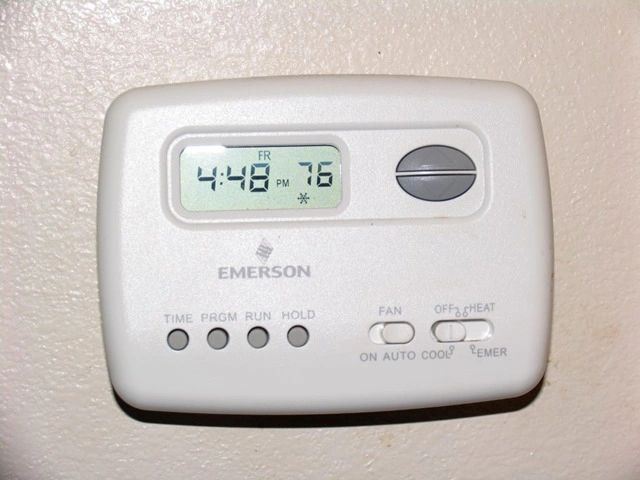
Here is what I am doing and it is so simple. During the day, my programmable thermostat is set to a fairly cool temperature, within the limits of what the array can supply. Usually, that is around 76 degrees. I am looking into building a smarter thermostat that will take into account the state of the battery charge and the weather, so that I can squeeze out a little more performance without being here to manually manage things. At night, the thermostat gets set to 79. Some folks could not go for that range, but as a native Southerner who grew up without a/c, no sweat. Literally. The reduced humidity of the a/c is as big a factor as the temperature on one of those hot, muggy days.
Ok, so where’s the storage? What’s the medium. Look around your house. Sheetrock walls, tile floor, pots and pans, that cast iron bathtub, brick or stone fireplace…anything and everything with some thermal mass. You’ll have the cooler temps when you are stirring about and need it cooler for comfort, but at night, when you are reading, watching the tube or sleeping, the temperature will slowly creep up as thermal mass will slowly absorb the heat seeping in. At a high in the high 70s should be fine, especially with a ceiling fan. I still have the a/c running some during the night, especially those nights, but not nearly enough to run down the battery bank.
Just leaving the thermostat at one temperature has its merits, but for using the power when you are making it, changing temps makes for longer run cycles to optimize efficiency. I know from observation that my PV is putting out enough power to run the a/c without getting into the battery about 9:30 a.m. in the summer. Having the program go into cool-down, starting then, means I can run the a/c without taking the battery down any lower and any time after that I am building power to fully recharge by the end of day. In the late afternoon, I cross that threshold again around 5 p.m. The frequent afternoon thunderstorms can play havoc with that, though, hence the quest for a smarter thermostat.
My house is powered by a hybrid system, part on and part off grid, so I still get a power bill. I suspect some of my neighbors have cooler homes than mine, but I bet they have bigger power bills, too.
—Neal
Show and Tell
I wanted to show you a couple of examples of some really nice solar work I have seen lately.
I’ve known Courtney for 60 years. Back then Courtney was a guy name and, in his case, it still is. Courtney has gone nuts for solar in the last few years and he is at it again. In addition to our joint solar a/c schemes, he decided that his curved solar pergola grid-tie is not putting out enough to suit him, so he’s adding modules. There is no more room on the pergola, but there is plenty on his north fence, which happens to be close to his grid tie gear. Between the fence and the retaining wall we built (somehow I got roped in on that) he came up with a quick and easy mount that looks good, I think. Under the panels it would be easy to integrate some sort of box for storing yard tools or such.
This is just to try out…He’s adding more.

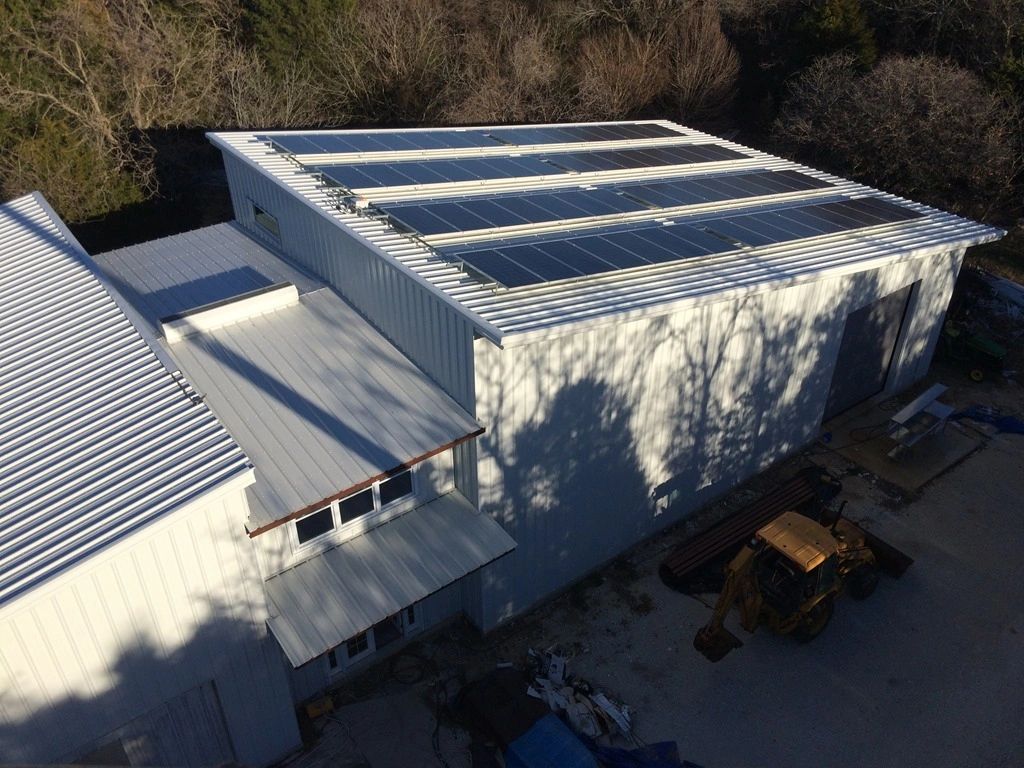
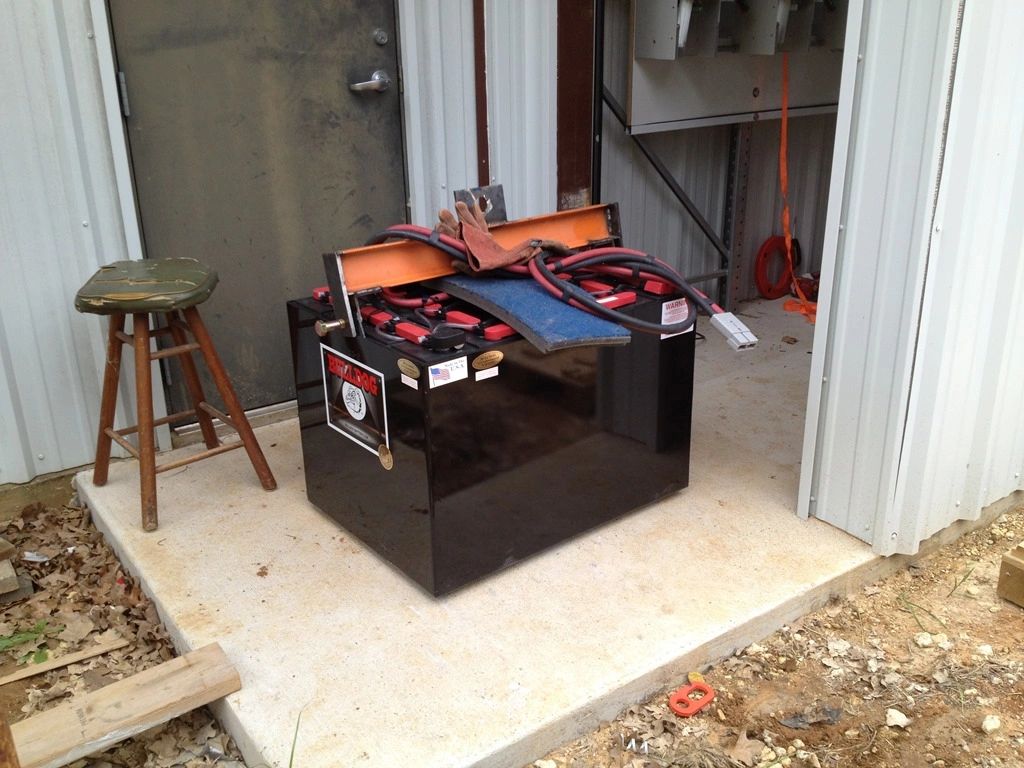
Then there’s Daryl, to whom John introduced me a week or so ago. OMG what a system he has and what beautiful work he does! Daryl lives in a barn in Texas. No kidding, it is a Texas thing and they call them “Barndominiums.” This is neither Daryl’s first barndo nor his first solar power rodeo. Sadly, there was a fire that destroyed the first. Texas has some serious hail, so his first system actually had doors that slide on rails to protect the solar panels! The new barndo has 16kw of modules, ganged inverters and a monster battery. And it is simply elegant! It is grid-tie with battery backup and he sells more power to the grid than he uses. Here’s where the kilowatts begin
Here is where kilowatts live…in the giant BullDog battery. Moving that dawg requires mechanical assistance.
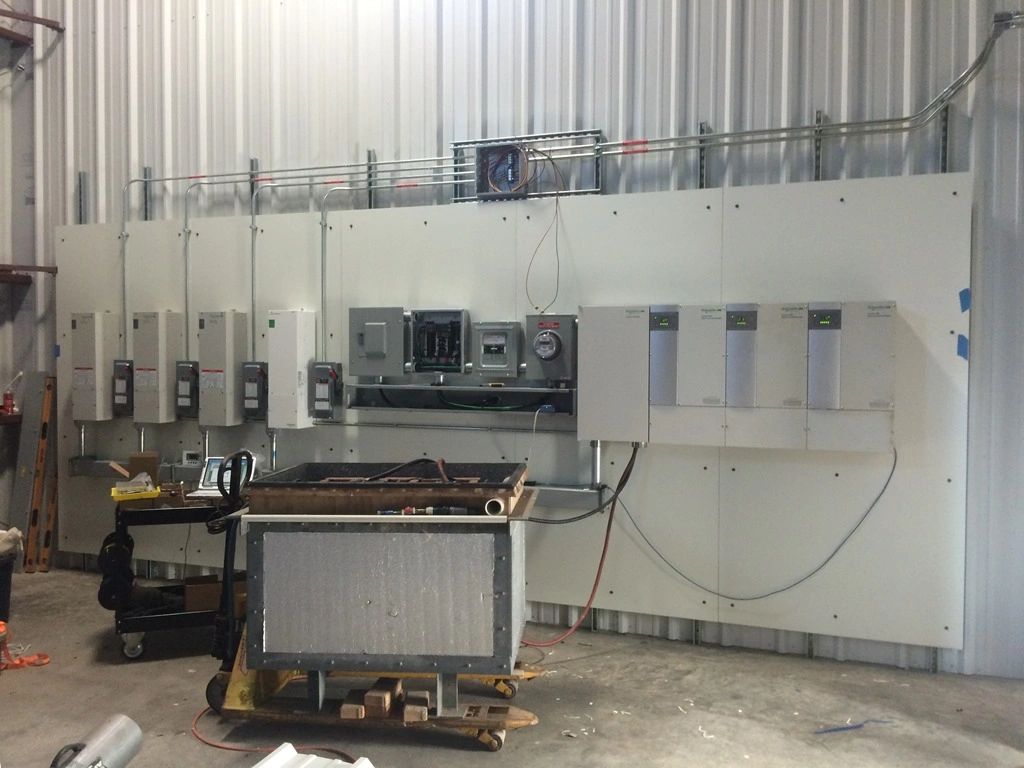
And everything has to pass through here
THREE inverters, Daryl??? Really???
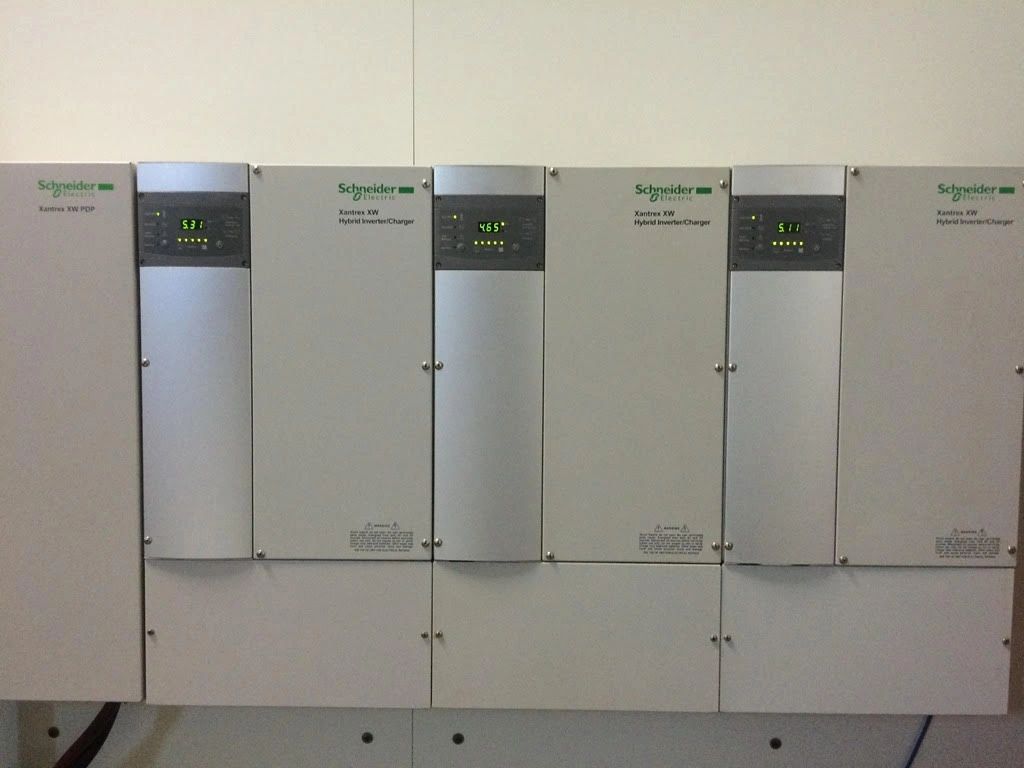
Okay, I admit it. I’m jealous.—Neal Photos: Courtney and Daryl
Cool It
I never thought I’d be happy about a tropical depression starting to spin up in the Gulf, but it has been really, miserably and mind-numbingly hot around here and the rains have helped in that department. We’ve topped 100 degrees for days, usually hitting 103-105 after lunch. It has been so hot that I have been wearing welding gloves to handle modules I am remounting. Of course, inside the Solar Shed, it is even hotter and even the a/c out there is no good until I get some insulation.
Fortunately, that temp is within specs for all of my gear, but I know the fans and capacitors will last longer if I can make it run cooler. Further, since it has temperature sensing that cuts back the wattage to keep the temperature down, running cooler will put more watts back into my batteries.
I have some charge controllers I am evaluating for John to possibly carry and they have built in thermometers. The display was showing 57C, which is right at 135F for Americans. The charge controller has a fan and the entire aluminum case is designed to dissipate heat, but it was hot to the touch and the fan was always running. The thing is, the entire back, over 1/3 of the surface area, was pressed against the wooden mounting panel, effectively insulating it. Why not mount charge controllers on standoffs? A drilled piece of rod, a stack of washers or a slice of old broomstick with a hole down the middle would each make a dandy standoff. I had some aluminum heat sinks I found on ebay that may or may not do even better.
Note the fins behind the charge controllers.
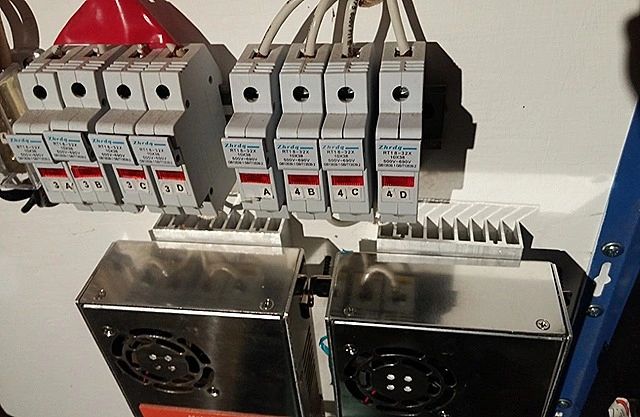
I removed the old screws, smeared some silicone heat sink grease (available online or at an electronics store) on the heat sink, wedged it behind the controller and snugged down four new, longer, screws. That’s all there was to the first one, so I did the second. In no time the controllers’ internal temp dropped 14C or 25F.
I suspect that simple spacers would do about as well. This afternoon, after a thundershower, it was only 98F in The Shed and I noticed that the fans were not even running. I think I will watch this a few days and try it on the others.
If your mounting panel is metal, then you already have temperature dissipation help. For anyone else, this is a good, cheap mod. Now as to why I was arranging panels in the hot sun, it isn’t just cooling down the equipment I am working on. Nope, I am continuing the quest for solar powered a/c. Early small scale tests have shown promise (mostly meaning I haven’t started a fire) so I am making room to dedicate 8 to 11 modules to running a conventional a/c on solar with no wires going into the house and only three going into the outside cabinet. Watch for that. It may take a while to get all the details ready for you, but the mod will work in heatpump season, too.
I do have some tried and true solar a/c that I wrote about in the blog. That may have disappeared when the blog blew up, so we will try to get that reposted. I am running BOTH of my 30 year old Rheem central air systems and most of my other circuits on a single 5kw inverter, and it isn’t that hard to do. Watch for it to reappear if you can’t find it.
–Neal
RTFM!!!
RTFM!!! That stands for Read The Fine Manual. There are variants on that acronym, depending on your vocabulary.
That’s what we used to say when a customer wanted to know how to work something he bought from us, but was unwilling to read the instructions. This happens a lot with solar stuff, too. You may have products that can do more work for you, saving you from having to buy other gear. Wouldn’t you like to know stuff like that?
Case in point, I had a problem with having too much power on a sunny day with lots of puffy cumulus clouds. The charge controllers would get all settled down in the shade of the cloud, then it would pass and it’d go high enough to trip overvoltage conditions on the inverter and/or one of the charge controllers. The one charge controller would shut down until manually reset, the inverter would clear itself as soon as the other charge controllers caught up with the increased sunshine, usually just a couple of seconds. It really wasn’t a huge deal to me, but the princesses do not like to have their afternoon DVD features interrupted, not even for a few seconds.
I can think of lots of ways of dealing with this. Setting the dominant charge controllers worked out most of it, but it could still happen. A diversion load controller, like the windcharger crowd uses would be perfect, except it costs several hundred bucks for one of those. I think it is a C40 charge controller that some folks use for solar can do the same trick, but I don’t have one and don’t want to spend several hundred bucks for one of those, either. You should see a pattern here about my reluctant spending habits.
In my younger days, I’d have simply designed and built a custom controller to disconnect several banks of solar panels, putting the system on a more defensive stance. I don’t want to be bothered with that, anymore.
It turns out, though, if I just RTFM on stuff I already own, lots of gear has extra functionality built in that nobody ever uses or maybe they under use it. For example, let’s take the FlexMax family of charge controllers. If you’ve bought one of John’s kits, there’s a good chance that you have one or more of these, already. It is a popular model and built like a tank. Pop the hood and you will discover a tiny connection block that is programmable to drive a relay six ways from Sunday.
It’s the little gray terminal block marked 12v Aux Control on my revision.
This won’t do much as it is, but it will drive a 12v relay like the one that beeps the horn or rolls up the windows on your car. You can buy these, with a wired socket, at your auto parts store or Ebay. The relay, in turn, can control 30 or 40 amps of load or drive a contactor to solve my problem by disconnecting some banks of solar when the battery is charged. It can be programmed normally on, normally off, high voltage trip, low voltage trip or more, if you RTFM.
What can you do with this? Well, you can control a light to come on at night and off during the day. You can use it to enable high power loads, like a water heater or an a/c, when the battery is happy and not when it needs a little help, like on a cloudy day. Charge your electric vehicle when the main bank is good. Sound an alarm if the battery is low. Turn a fan on or off if your equipment room gets hot/cold. This thing has skills!
Study the description of the capabilities and you may think of more ways to use it. RTFM!
By: Neal Collier
Cool Running
We surely do get spoiled by some of our modern comforts, don’t we? When I was a kid, we didn’t have air conditioning at the first 3 houses in which I lived, nor at school. Our first car with a/c was a ’65 Pontiac. Although I don’t crank the thermostat down low, I still like to have it to knock down the humidity and cool down on those muggy Florida afternoons. One of the goals I have been working toward is to get the house’s central a/c on the solar. It is a big part of the power bill, so it is a good goal. I used 215 kwh from the grid this past mild month and would like to keep it close to that through the summer, instead of the 1500 kwh (or more) that my neighbors will use.
A few years ago, as an experiment, I parked Sun King (my solar launch) next to the house and ran a line from the boat’s inverter to a window a/c. It worked great, but a 5000 BTU window unit is not what you need for a two-story house. My first attempt at running the central unit on my 24 volt system almost worked, but only because I was low on freon. All charged up, I couldn’t quite get over that startup surge. It is probably just as well because I discovered that the transformer in that cheap Chinese inverter was just a wee bit underrated and would have melted running the a/c all day.
I know my 12kw inverter would have run it because it worked for the guy from whom I bought it…but lightning fried that hope. My homemade 5548 has a huge transformer and will put out thousands of watts continuously, but it still could not deal with that starting surge. I probably could have tweaked the overload settings, but it works fine, otherwise, and I did not want to break it. Should I give up? Ohhhh, no. In a case like this, we simply need to change the rules.
This surge problem doesn’t just come up when running on an inverter, campers and boaters like their a/c, too, but sometimes end up getting a really big generator to run it. My friend Courtney has a huge bus with a big, rumbly Onan generator. Run the thermostat down and that Onan acts offended when the compressor kicks on. After that first couple of seconds, the Onan settles back into its lazy rumble, but you can tell it doesn’t like the startup.
But, dig around on the internet and you’ll hear guys talking about running a one-ton or even an 18,000 BTU a/c on a Honda 2000 generator! What? I can’t run an 18,000 BTU a/c on a 5500 watt inverter, but they can run on a 2000 watt Honda? Let me give you a hint: they cheat. They changed the rules.
If you are looking to install a new a/c, one of these new-fangled inverter mini-split rigs might be the way to go. When they say “inverter” they mean a variable speed motor controller. A few makers put inverter compressors on full size systems, too. If you’ve not seen these, or paid attention, these units start the motors up slowly and run just fast enough to maintain the temperature you set. It really is hard to tell the things are running! In addition to eliminating the starting surge, you may end up using half as much power in the long run with units up to a SEER 25 rating. For comparison, my 30 year old unit is a “High Efficiency SEER 13” model. You’ve seen the TV commercial with the old a/c unit quivering, rattling and giving off a puff of smoke? That’s mine.
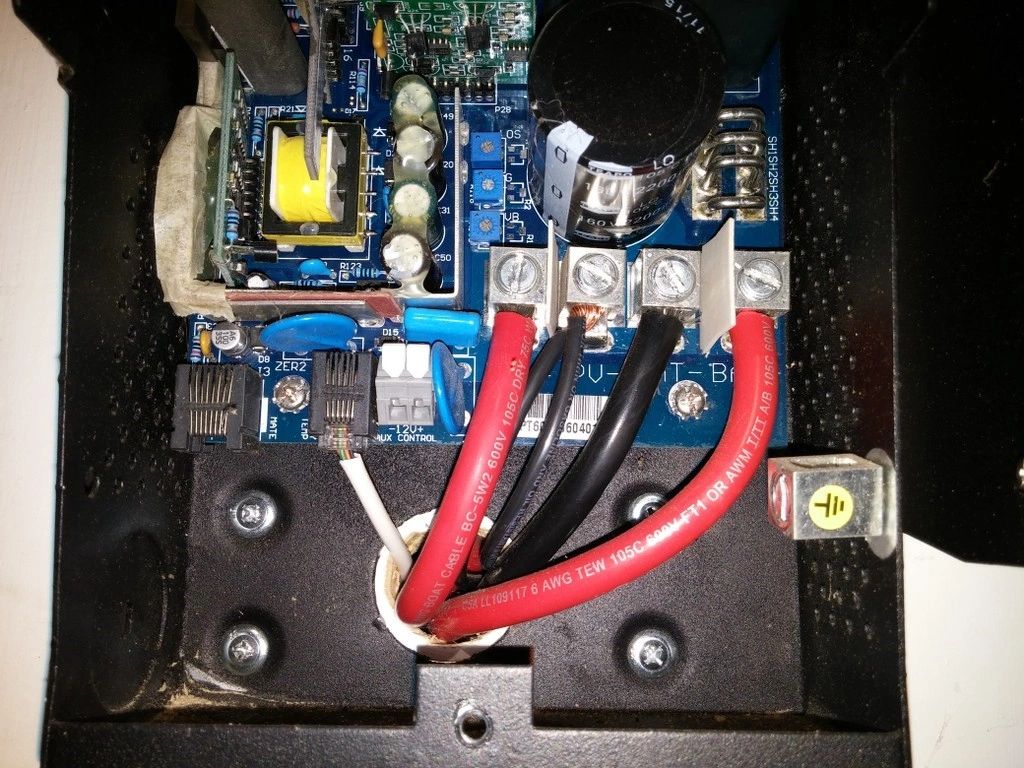
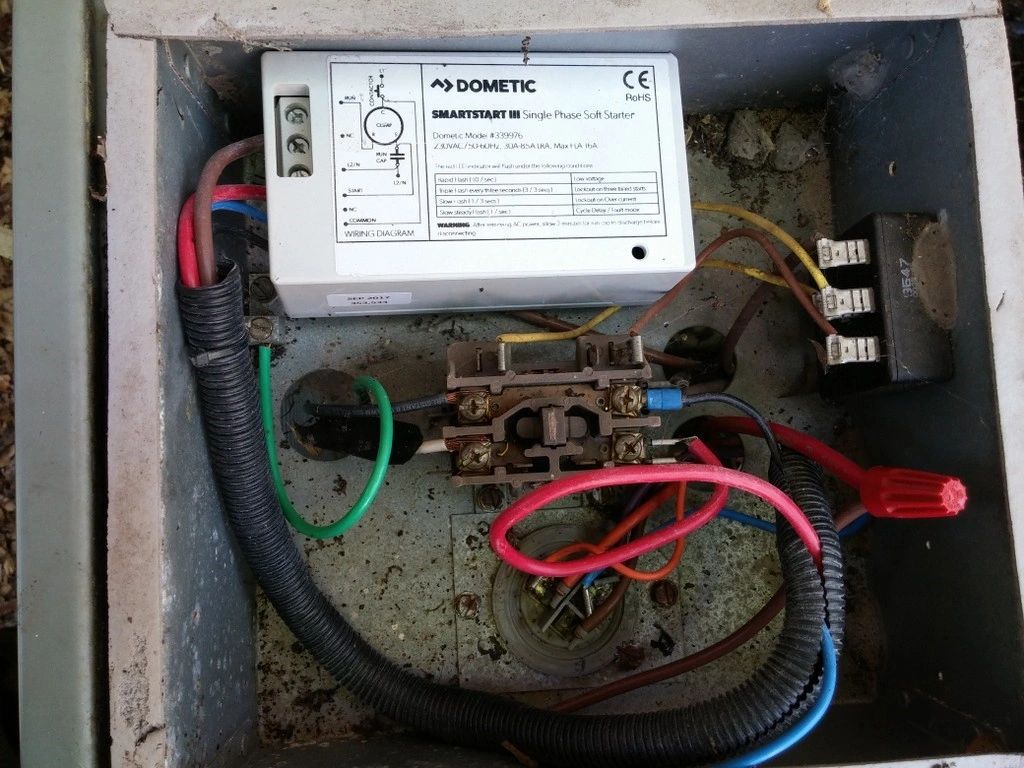
Yeah, but if you are like me and are not too keen on spending 6 grand to replace something that still works and will run on FREE electricity (assuming I can get it to run at all) you may want to “cheat” like those campers and boaters are. You see, there is a thing called a “soft start” that emulates the slow spinup that the inverter units use. They sell under the trademark names of Dometic SmartStart and Hyper Engineering Sure Start. They aren’t cheap, listing around $600, but you can shop around. I found a couple for my units for $100 each from a marine salvage dealer. Buying something used without documentation may not be something you’d feel comfortable installing yourself, so you might hire that job out or get your HVAC dealer to come up with one.
Changing the Rules: SmartStart on my A/C
When the time came to give it a try, one of the golf cars was charging and the refrigerator was in auto-defrost mode, so there was already a good load on the inverter. I ran down the thermostat and the lights gave 3 little flickers as things began to run. The starter has a microprocessor that learns the load and afterward the startup was so gentle you had to watch for any flicker at all. I would say it dims the lights less with everything on the solar power than it did when everything was on grid, without the starter. Once underway, the compressor is pulling maybe 1800 watts and plugging in the golf car or firing up the Keurig while the princesses are watching Disney in the living room still leaves power to spare. The one unit upstairs will cool the whole house, but I will go ahead and convert the downstairs a/c, too, when I get the 10kw inverter built.
What about nighttime? I do not have enough battery to run a lot at night, but I have a plan. Using the programmable thermostat, I will really cool down the house during the day. When you are active, a little cooler feels good, anyway. Then, late in the afternoon, I’ll run the thermostat up a few degrees. The thermal mass of the drywall will hold that cool for quite a while, maybe even until morning, if it isn’t just awfully hot. I have no doubt the average house temp will be cooler than it has been when I was paying for those overpriced kilowatts from my power co-op.
So, success at last! The only problem is we have a cold spell for the next week or so and I don’t need a/c! That’s ok, the heat will come, eventually, and I will be ready. What about you? Are you up for getting a little more comfort out of your solar power?By: Neal Collier
Battery safety tips
Bring a big truck when you visit and work safe when you get home.I write this stuff for fun and to be helpful. I’m not an employee of Sun Electronics, I’m a customer. In my role as customer, I set out the other afternoon for my third visit to Sun’s Miami headquarters and my first visit to the Miami Lakes facility. This place is a lot nicer than the Miami Gardens warehouse, though it lacks the artistic touch left at the old place by some tag artists.
It is a round trip of 1482 miles for me, so I like to make a good haul of it. I brought my big trailer. We stacked panels until the fenders rested on the tires and I made the decision to leave two pallets behind. 14kw will keep me busy for a while, anyway. I also didn’t get as many batteries as I wanted. Upon calculation back home, I figure I brought home close to 6000 lbs. I could have carried that extra stuff, after all! We just needed to pry the fenders up a little further off the tires.
Live and learn.

Well, back home, I had some ideas how I was going to treat the batteries on my new 48v system a little differently. I like to improve safety and efficiency as I go. I know ways of doing it wrong, both from investigation and from practical experience. One of the easiest ways of blowing up some batteries is to hook them up backwards. The things are marked plus and minus and we all know not to mess up the connections, but you get tired, the area may not be well lit and the batteries may have some dust or baking soda on them to obscure the markings molded into the cases. Furthermore, those pesky cables get in the way! Believe me, you CAN hook them up wrong and I HAVE done it and didn’t like how it worked out.
First thing I did before taking them off the tailgate was to hit the POSITIVE corners with a dash of white paint. I thought about red but Trojan batteries are sort of red, so I think the white will stand out better, even in poor light. White on the black Sun batteries will not be confused.
After the paint dried, I used a felt marker to put the date, 11-18, on the white patch. Time gets by, you know. If you don’t date them, 8 years from now you’ll be wondering why those batteries you JUST BOUGHT aren’t holding a charge like they used to. My Dad dated every tool and appliance he bought and I have decided it is a good idea.
Next step is to get out a little tub of grease, or maybe get into the grease gun you use for the pickup. The area where the lead terminal pokes through the plastic case should be sealed, but you will always find one or two that eventually leak acid fumes and make green stuff corrode your nice battery cables. Take the grease and smear it around that transition from lead to plastic. Then save some to coat the terminals when you get your cables connected.
And speaking of terminals, why not make new battery cables for your new batteries? I checked and found I have a good supply of double-ought (2/0) cable and around 30 big, tinned terminals for 5/32″ studs. That’s probably overkill, but I am good to go. I need to order a bit of marine shrink tube.
Some people crimp with a tool that looks like a bolt cutter with dull jaws. I have a couple of tools that look like little presses. You put the terminal on the wire, poke it between the jaws and beat the heck out of it with a big hammer. For even less resistance, I then heat the terminal with a torch and slip some solder inside. I finish by covering the transition from wire to terminal with marine shrink tubing. This is available in red or black, coding + and -, and it has an inner lining of melty glue like you get from a glue gun. You shrink that stuff down with a heat gun or torch (if you are careful) and nothing is getting in. AND the color gives you a surefire coding for polarity.
Why is polarity so important? If you try to connect two banks of batteries in parallel and do it backward you will blow yourself up. Usually the cases don’t blow apart, but everything gets sprayed with acid and your battery caps get ruined if they are the push-and-twist variety. If you blow up a set of the expensive water saver caps you will be especially displeased with yourself. If you aren’t wearing your safety glasses you can be blinded. Your hearing might be damaged. Your clothes will need to be replaced, even if you wear a protective apron. Don’t blow up your batteries.
That’s hooking batteries up backwards. What if you get the battery banks right and then connect backwards to your charge controller or inverter? If you bought hardware with “reverse polarity protection” then nothing will happen. NOTHING. If not, there will be a spark, a puff of smoke and you just trashed a $500 charge controller or a $5000 inverter!
The synopsis of all this is that it is best to hook the batteries up right and any trick you can come up with to help you avoid a mistake is smart procedure. So, wear your safety gear (goggles, gloves, apron), color code your batteries and cables and check your work with a meter before making the connection.
Something else to consider is that some things will give you a spark, even when you do connect it right. Charge controllers and inverters have big capacitors that will draw a huge quick current as they charge when you connect. If you connect to a battery post the pop may ruin the threads and I don’t think you will have a lot of luck rethreading that stainless stud. Make a quick jab at a place that is not threaded on a battery or equipment connection. Let it get the pop out of its system and then slip on the terminal and the nut. Oh, and making that pop on the battery ends of things is making a spark near a source of hydrogen gas, so best to do your sparking elsewhere. I have a big knife switch that lets me disconnect all the charge controllers when connecting the battery bank and I just slip the fuse out of the inverter.
And, hey, next time you see some of those nice LED shop lights on sale, get one to put over the batteries to make it easier and safer to hook up, tighten up and water up when installing or doing maintenance. More battery ideas next time.
By: Neal Collier